
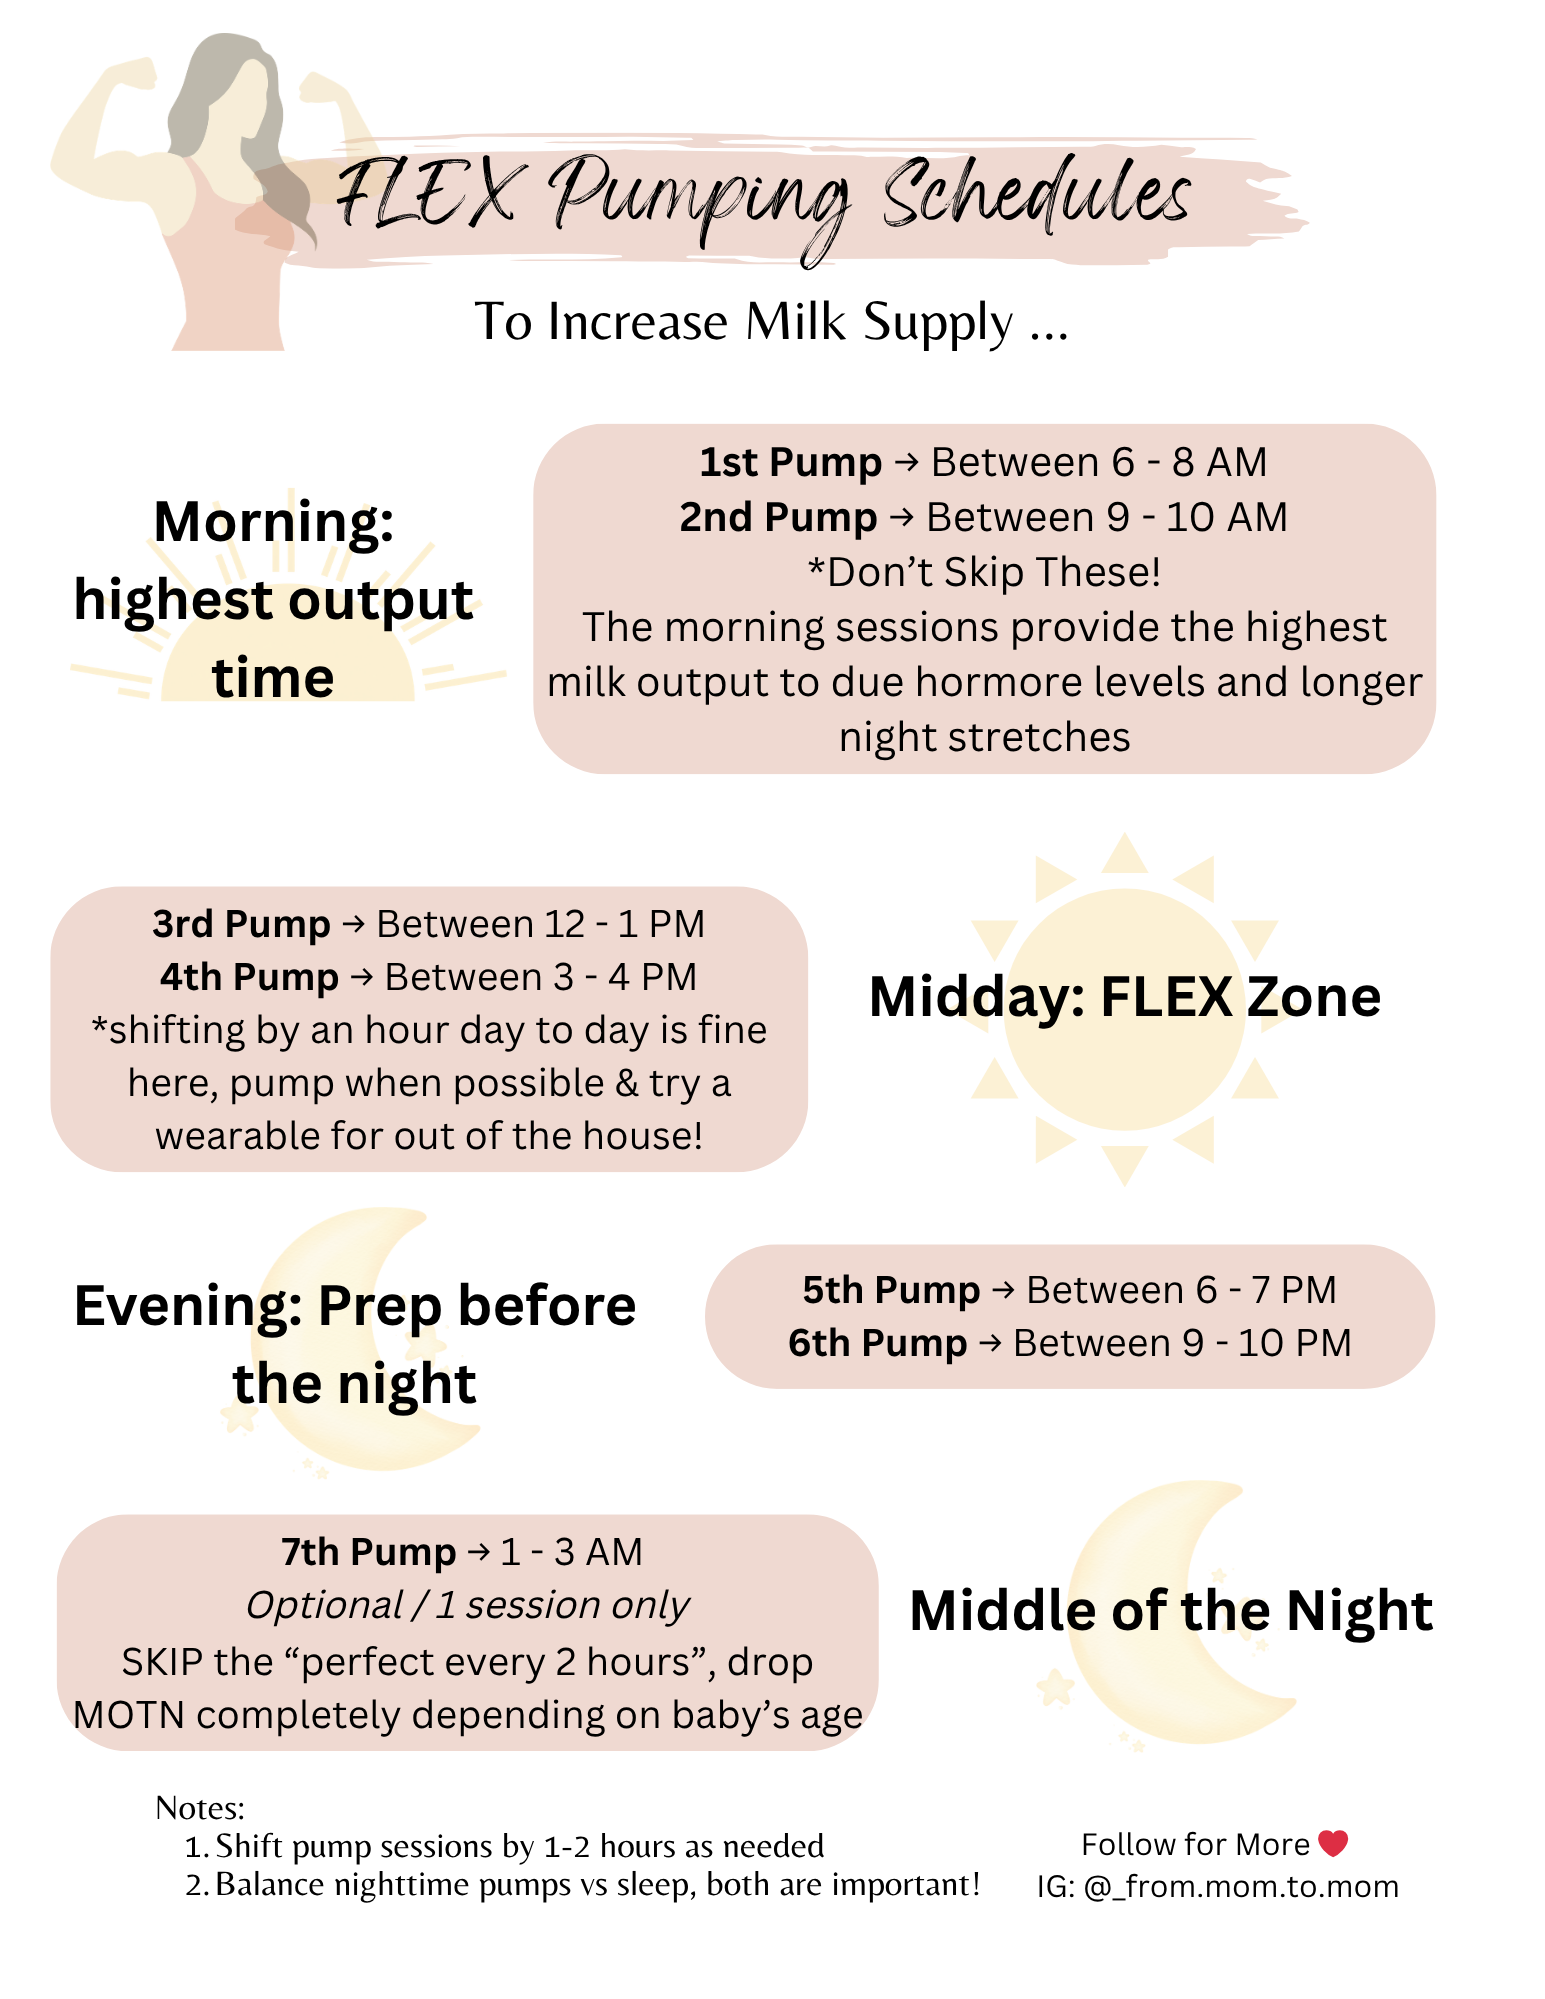
FLEX Pumping Schedules
…because pumping schedules are NOT one size fits ALL Moms!
Pumping schedules are often shared as if there’s one “perfect” routine, but the truth is, there’s no universal formula that works for every mom. Your body, your baby, your lifestyle, and even your stage of postpartum recovery all play a role in what your pumping journey looks like. Some moms thrive on a strict every-3-hour schedule, while others see better results with flexible, on-demand sessions. Factors like milk storage capacity, hormone levels, stress, sleep, nutrition, and even the type of pump you use can drastically impact output. Following a rigid schedule that doesn’t align with your body can actually lead to frustration, burnout, or even a dip in supply.
Instead of forcing yourself into a one-size-fits-all routine, it’s more effective to learn your body’s patterns and build a schedule around what works for you. For some, that might mean adding a power pumping session in the evening; for others, it could mean spacing sessions slightly longer to avoid overwhelm. The goal isn’t perfection.. it’s consistency and sustainability. When a pumping schedule feels realistic and supportive of your daily life, you’re far more likely to stick with it, which ultimately supports milk production in the long run. Give yourself permission to adjust, experiment, and evolve your routine as your body and your baby’s needs change.
That is EXACTLY why I created these FREE FLEX Pumping Schedules Examples and Schedule Builder so you can find your perfect fit.
Pumping Must Haves To Save You Time and Sanity!
✅ One of the BEST Things I did for myself to make pumping easier and more realistic was invest in a wearable pump!! my top recommendation is the affordable and effective Momcozy m5 USE ✨BELLPUMP✨ promo on all Momcozy pump on Amazon to save extra!
PUMPS:
1. BabyBuddha pump: excellent efficiency and portable with hospital grade strength ✨ BELL10✨ saves extra $$ on BB site
2. Momcozy M5: amazing price for a portable pump! Pump anywhere while not sacrificing milk output: ✨ BELLPUMP ✨ saves extra$$ on Amazon / momcozy site
3. Momcozy Air 1: Extremely lightweight and thin wearable pump! Many settings to find your perfect session and very comfortable. Full control through the app✨ BELLPUMP ✨ saves extra $ on Amazon / momcozy site
Other Pumping Moms Essentials List:
1. Momcozy Bottle Washer: NEVER hand wash again! SAVE 10% extra with promo ✨ HelenC15 ✨
2. Momcozy Air 1 Wearable Pump with charging case! Can last up to 6 days of charge. Extremely thin and lightweight for on the go ✨ BELLPUMP✨ to save an extra 10% on Amazon or momcozy website *BELLPUMP good for $ off any momcozy pump
3. Momcozy Portable Milk Cooler (24 hours cooling, 360 degree cooling, 2 bottles): Amzn promo ✨ 10MC1helen✨
4. Momcozy Portable Milk Warmer: Amzn promo ✨ HELENMS10 ✨
Here is the FLEX pumping schedule, hope this helps you!
✅ If you want ALL the details, multiple pumping, nursing schedules, lactation recipes, increasing milk supply checklist - GRAB my FULL pumping guide on my website below along with additional helpful resources!

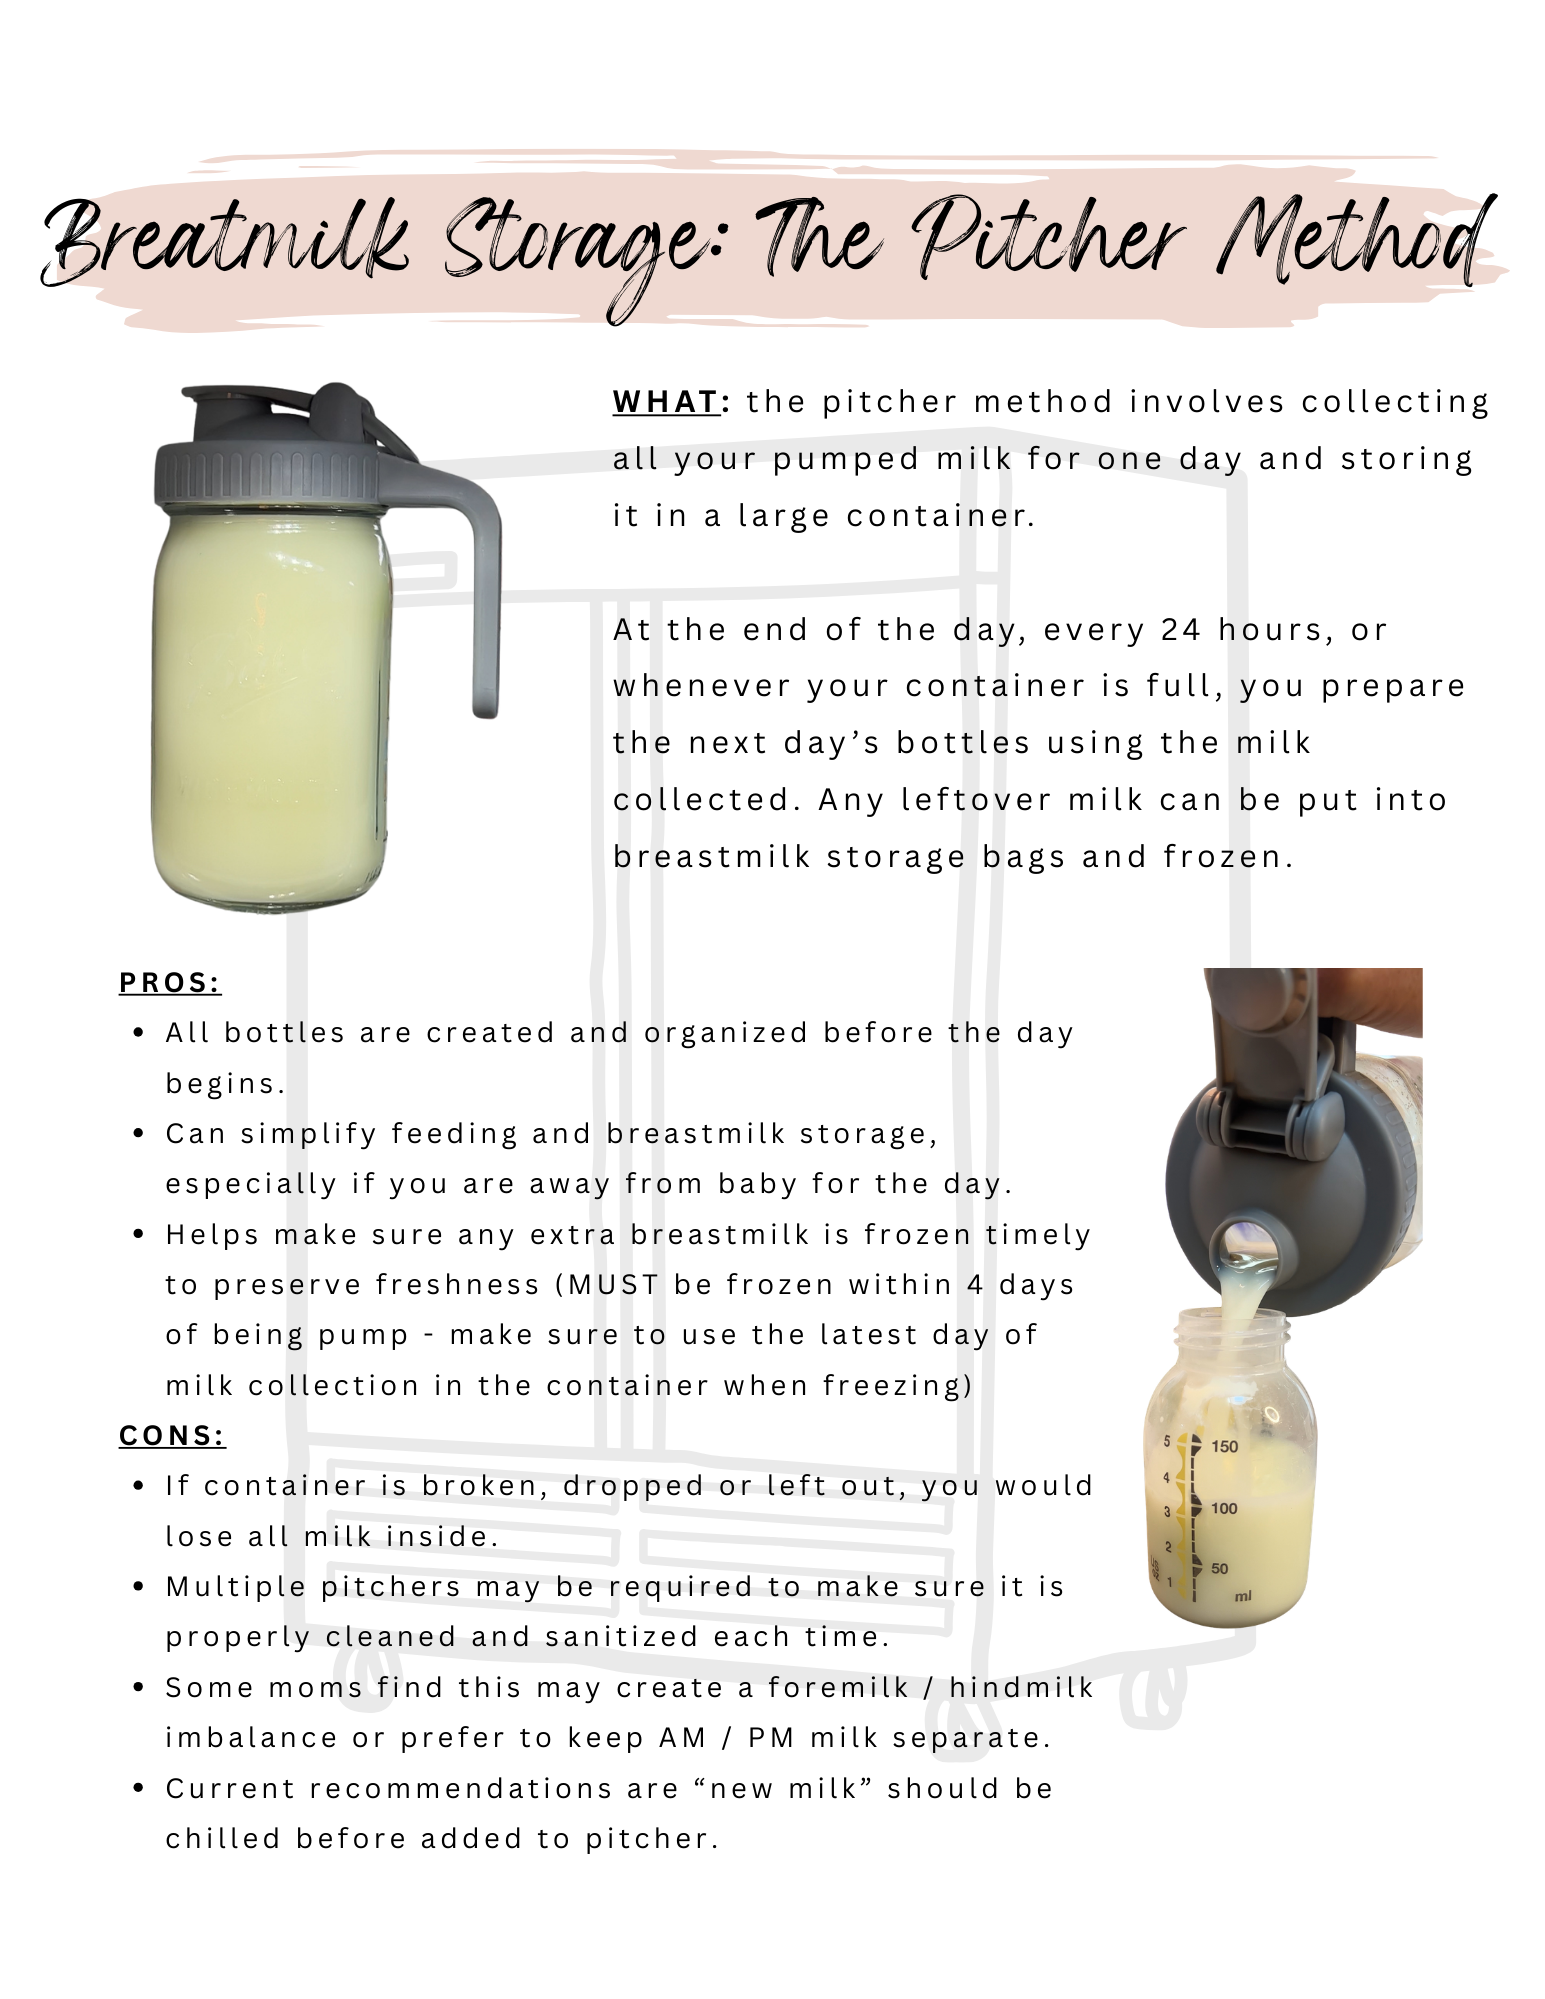
🍼 Breastmilk Storage: The Pitcher Method (Complete Guide for Pumping Moms)
If you’re exclusively pumping or building a stash, you’ve probably heard of the pitcher method.. and for many moms, it’s a total game changer.
But is it right for you? Here’s everything you need to know.
🤍 What Is the Pitcher Method?
The pitcher method is a breastmilk storage technique where you collect all the milk you pump throughout the day into one large container (usually a glass pitcher or mason jar stored in the fridge).
Instead of separating milk into individual bottles right away, you:
Pump throughout the day
Add each session’s milk to one container
At the end of the day (or every 24 hours), portion milk into bottles for the next day
Any extra milk can then be transferred into storage bags and frozen.
🧊 How to Use the Pitcher Method (Step-by-Step)
1. Choose your container (LINKS below to my top recommendations)
Use a clean, food-safe container like a glass mason jar or breastmilk pitcher with a lid.
2. Chill freshly pumped milk first
Before adding new milk to the pitcher, place it in the fridge to cool.
👉 This helps maintain safe temperatures and prevents warming previously chilled milk.
3. Combine milk throughout the day
Once cooled, pour each pumping session into your main container.
4. Mix and portion at the end of the day
After 24 hours (or when full), gently swirl the milk to evenly distribute fat.
Then:
Prep bottles for the next day
Store remaining milk in bags
5. Freeze any extra milk
Label bags with the earliest date in the pitcher and freeze promptly.
✨ Benefits of the Pitcher Method
✔ Saves time
No more prepping bottles after every pump session—everything is done at once.
✔ Simplifies your routine
Perfect for busy moms, working moms, or anyone juggling multiple feeds.
✔ Balanced milk composition
Mixing milk from different times of day can help even out fat content.
✔ Helps reduce waste
You can clearly see how much milk you have and freeze extra before it expires.
✔ Makes next-day feeding easier
All bottles are ready to go—huge win for those early morning feeds.
⚠️ Potential Downsides to Consider
✖ Risk of losing milk
If the container is dropped, left out, or contaminated, you could lose an entire day’s supply.
✖ Requires strict hygiene
You’ll need to regularly wash and sanitize pitchers (some moms rotate between 2–3).
✖ May not work for every baby
Some moms prefer separating:
Morning vs. night milk
Higher-fat vs. lower-fat milk
✖ Foremilk/hindmilk concerns
While mixing often balances this out, some moms prefer not to combine.
Important Safety Guidelines
To safely use the pitcher method:
🧊 Always refrigerate milk promptly after pumping
❄️ Chill new milk before adding it to the pitcher
🕒 Use or freeze milk within 4 days of pumping
Label frozen milk using the oldest milk in the batch
🧼 Clean and sanitize your container daily
Pro Tips From Pumping Moms
Use a wide-mouth mason jar for easy pouring (see links below)
Keep a backup pitcher so one is always clean
Gently swirl (don’t shake)
Pre-measure bottles before bed = smoother mornings
Use a marker or label system to track dates easily
Is the Pitcher Method Right for You?
The pitcher method is ideal if you:
Pump multiple times per day
Want a simpler routine
Are prepping bottles ahead of time
Need efficiency (especially with a newborn)
But if you prefer tracking milk by session or time of day, you may want to stick with individual storage.
Final Thoughts
The pitcher method is about making pumping more manageable and sustainable for you.
For many moms, it turns a stressful routine into something simple, organized, and even empowering. But of course, it is not right for everyone, so give it a try and see if helps save your time and sanity!
Must-Have Products Recommendations for the Pitcher Method
🥛 1. Breastmilk Pitchers (THE essential)
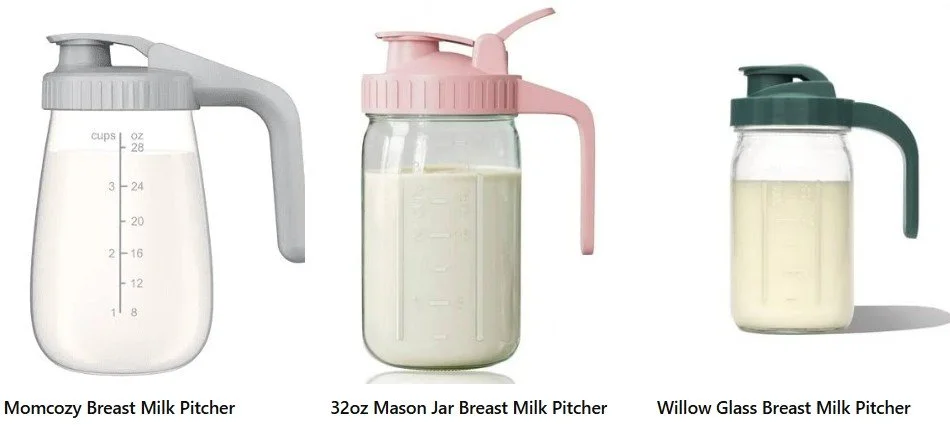
(Top Recommendation) Momcozy Breast Milk Pitcher: https://amzn.to/41bDER8
32oz Mason Jar Breast Milk Pitcher: https://amzn.to/3Pb97Am
Why you need it:
Designed specifically for breastmilk storage
Leak-proof lids = no lost milk
Wide-mouth = easy pouring + cleaning
EXTRA tip: Get 2–3 pitchers so one is always clean and ready.
🧊 2. Cooler Bags (for on-the-go moms)
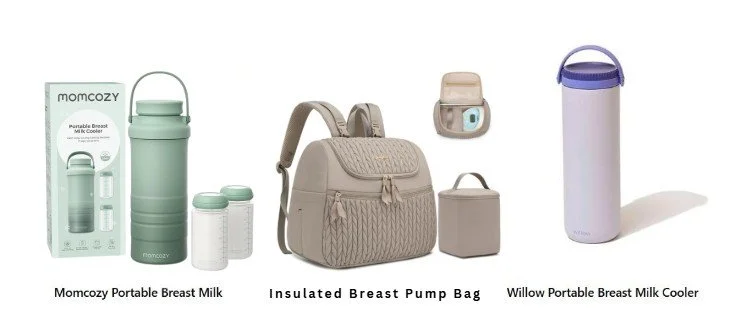
Amazon Cooler and Bag TOP Picks
✨Momcozy Portable Breast Milk Cooler https://amzn.to/47vsZEH ** USE PROMO ✨ 10MC1helen ✨ to SAVE an EXTRA 10%
Insulated Breast Pump and Milk Bag https://amzn.to/4byLh8T
Willow Portable Breast Milk Cooler https://amzn.to/4uF6O8O
Why you need it:
Keeps milk cold while pumping outside the house
Essential if you're combining milk later at home
24 hours safe breastmilk storage: depending on design
❄️ 3. Freezer Storage Bags (for extra milk)
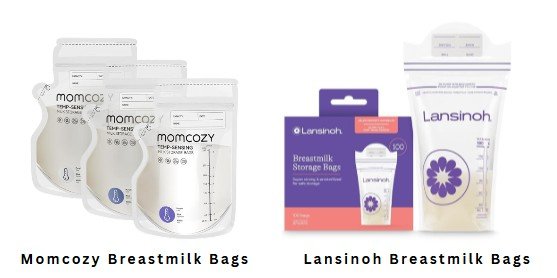
Breastmilk storage bags
Momcozy Breastmilk Storage Bags (larger size): https://amzn.to/3PiQ6Ms
Lansinoh Breastmilk Storage Bags (easy lay flat): https://amzn.to/4rGt0g4
Amazon Links HERE
Look for:
Double-zip seal
Pre-sterilized
Flat-freeze design
Leave your comment below if you would try this method or already have!
Clogged Milk Ducts: Everything You Need to Know🍼
Causes, Symptoms & How to Clear Them Fast
Did you know clogged milk ducts are one of the most common struggles breastfeeding and pumping moms face and they can happen even when you’re doing everything right?
The good news?
There are multiple ways to relieve clogged ducts, and it’s definitely not one-size-fits-all 💕
Every mom’s body, pumping schedule, and milk flow is different which means what works for someone else may not be your magic solution.
Let’s break it down 👇
🧠 What Is a Clogged Milk Duct?
A clogged (or plugged) duct happens when milk isn’t fully draining from part of the breast, causing a blockage and inflammation.
It often feels like:
• A hard or tender lump
• Localized pain or soreness
• Warmth or redness
• Decreased output on that side
If left untreated, clogged ducts can turn into mastitis, so early relief is key!
🍼Possible Causes:
• Going too long between pumping or nursing
• Poor flange fit
• Tight bras or pressure on the breast
• Incomplete emptying
• Sudden changes in pumping schedule
• Oversupply or thick milk
💡 Clogged Duct Relief: What Actually Helps
Here’s what many moms find effective:
✔ Frequent milk removal (gentle, not aggressive)
✔ Proper flange sizing
✔ Breast massage toward the armpit and nipple
✔ Warm compress before pumping
✔ Ice packs after pumping to reduce inflammation
✔ Ibuprofen (if approved by your provider)
✔ Sunflower lecithin to help thin milk
✨ The goal is reducing inflammation and allowing milk to flow not forcing the clog out.
**DID YOU KNOW?? Some smart pumps like the Momcozy M9 come with built in pumping modes like “Milk Boost” and 🌟 Milk Relief 🌟. These modes are expertly designed to provide you what you need in the moment! You simply start the pump, choose the mode on the app & sit back and relax!
Short on Time? Same, Mama!
If you can’t “sit around” pumping all day (because, let’s be real, who can?), a wearable pump can be a total game changer.
⭐ Momcozy M5 — super discreet, comfortable, and so effective at an amazing price!
⭐ Momcozy M9 — smart features, adjustable app settings, and built-in modes like “Milk Boost” and “Milk Relief” for effortless sessions.
🌟 BELLPUMP🌟 Promo for all Momcozy pumps on Amzn and Momcozy website! (see buttons below)
Momcozy PUMPS:
Combine promo BELLPUMP with the sale price PLUS the clickable coupon! Here is a breakdown on the pumps:
1. M5: lightweight, discreet, easy to use, efficient
2. M9: APP control smart pump, extremely comfortable, airtight
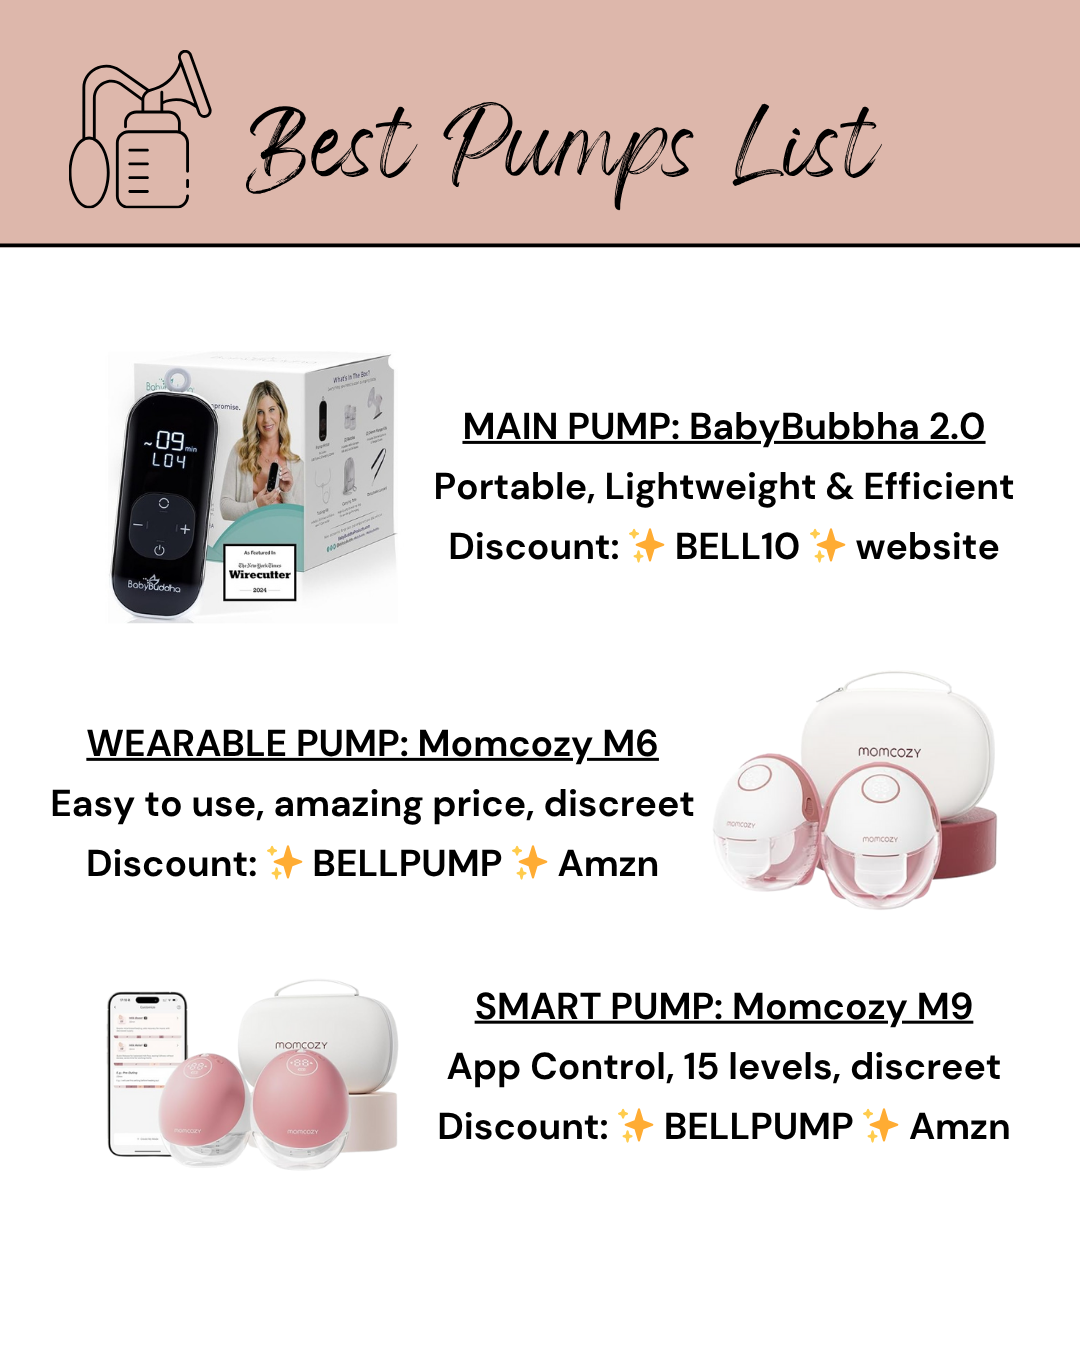
BabyBuddha PUMPS:
Combine promo "BELL10" with the sale price for the BEST deal of the year! Here is a breakdown on the pumps:
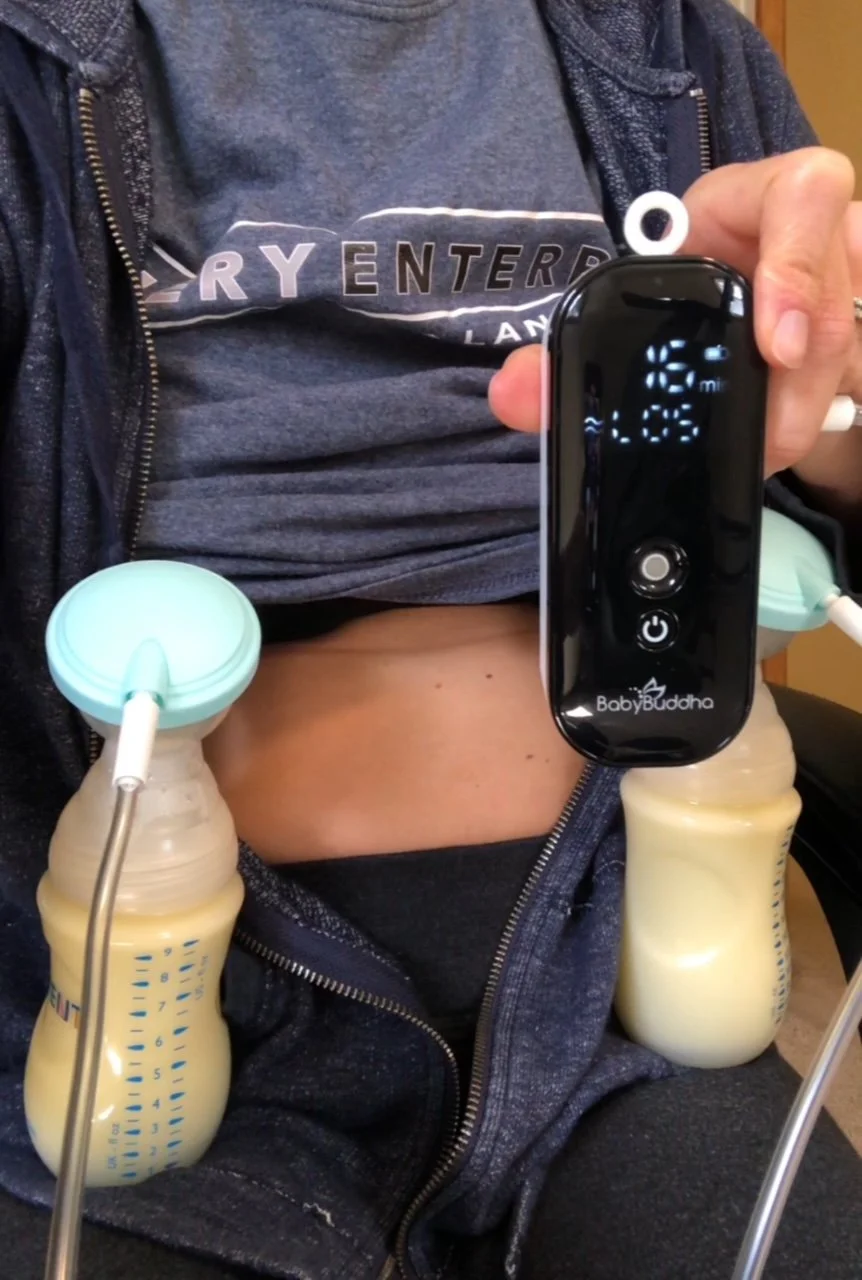
1. BabyBuddha 2.0: My main pump for the last 4 years over 2 pumping journeys! The pump that helped me finally be able to increase my milk supply after losing it almost completely. My TOP recommendation for you for a powerhouse pump.
2. BabyBuddha Wearable: NEW NEW NEW!!! This is the BabyBuddha wearable pump that mimics the 2.0 pump. Full of power, efficiency but completely in bra now!

Additional info on Clogged Milk Duct Relief and Prevention
Follow on Instagram for More
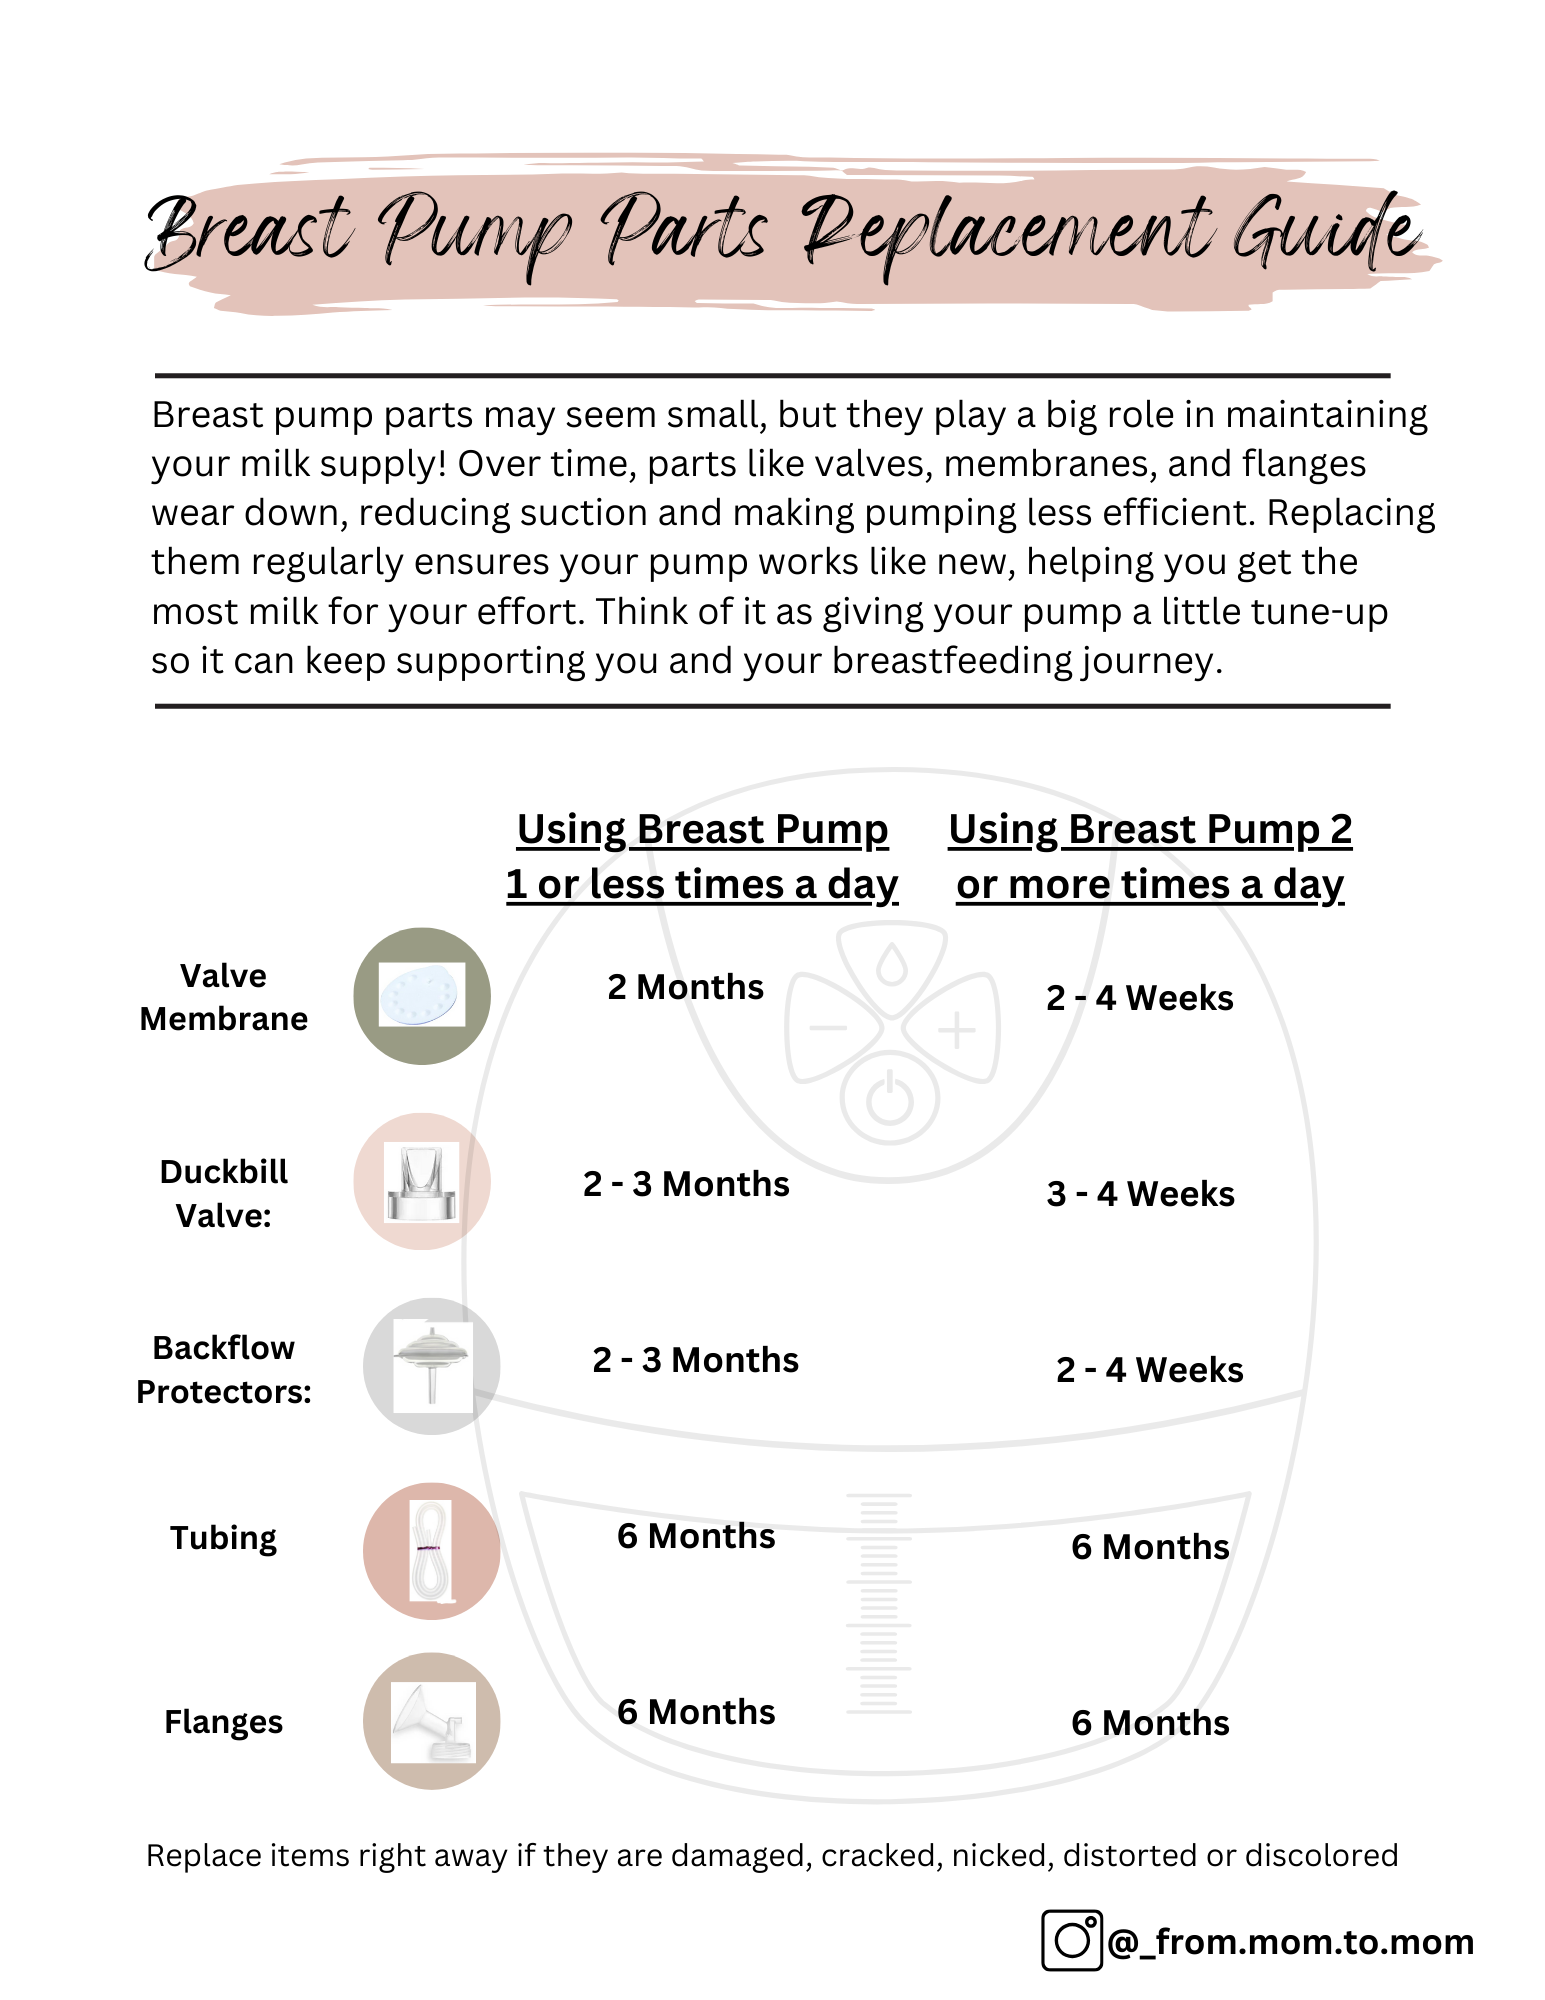
Breast Pump Parts Replacement Guide
Essential Tips For Milk Supply: Breast Pump Parts Replacement Guide
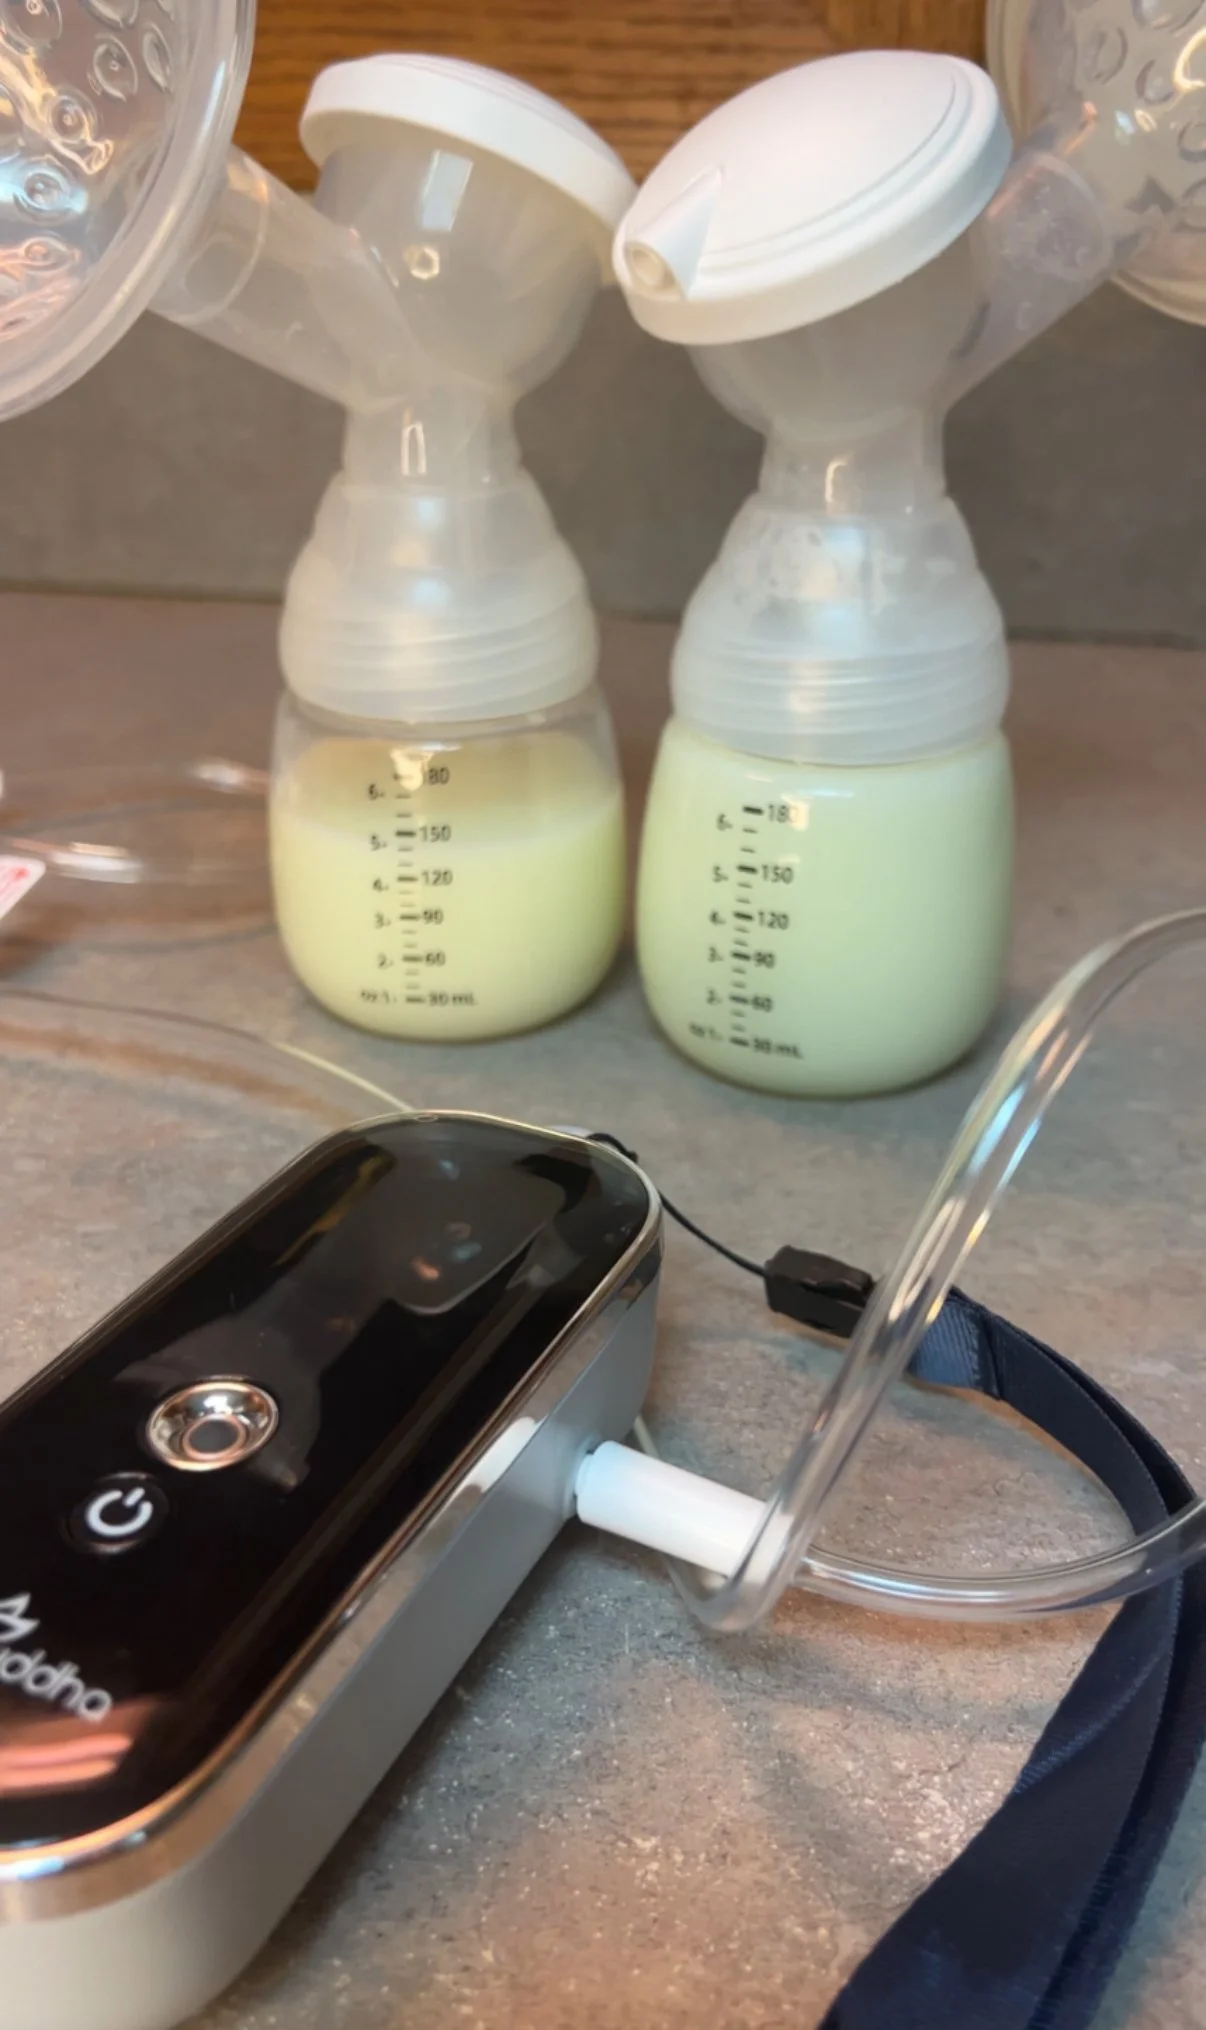
Did you know one of the reasons you might see a drop in milk supply a few months into pumping may be due to your pump wearable parts?? 😱 I had NO idea as a new mom how frequently these should be changed.
If you are exclusive pumping, make sure to follow the schedule of replacing parts in the guide, if you are not pumping regularly, then it can be longer.
The good news is I normally buy off-brand replacement parts and they work just as good if not better 🤫 one of my favorites is the brand “Maymom” on Amzn .. They have replacements for most major pumps. Check out my pumping essentials Amazon list below for the pump membranes, values and diaphragms.
Also … one of the best things I did for my pumping a journey was invest in an inexpensive wearable pump that works well and does not cost something crazy! 🤯 My TOP CHOICE -> MOMCOZY M5 (UNDER $150, easy to use and works well to empty milk completely hands-free)
SAVE HUGE on all Momcozy pumps on Amzn with promo 🌟 BELLPUMP 🌟 (this promo is good on all momcozy pumps)
#breastpump #happypumpingwithhelen #exclusivelypumping #newmomtips #breastfeedingmom
FOLLOW FOR MORE ON INSTAGRAM:
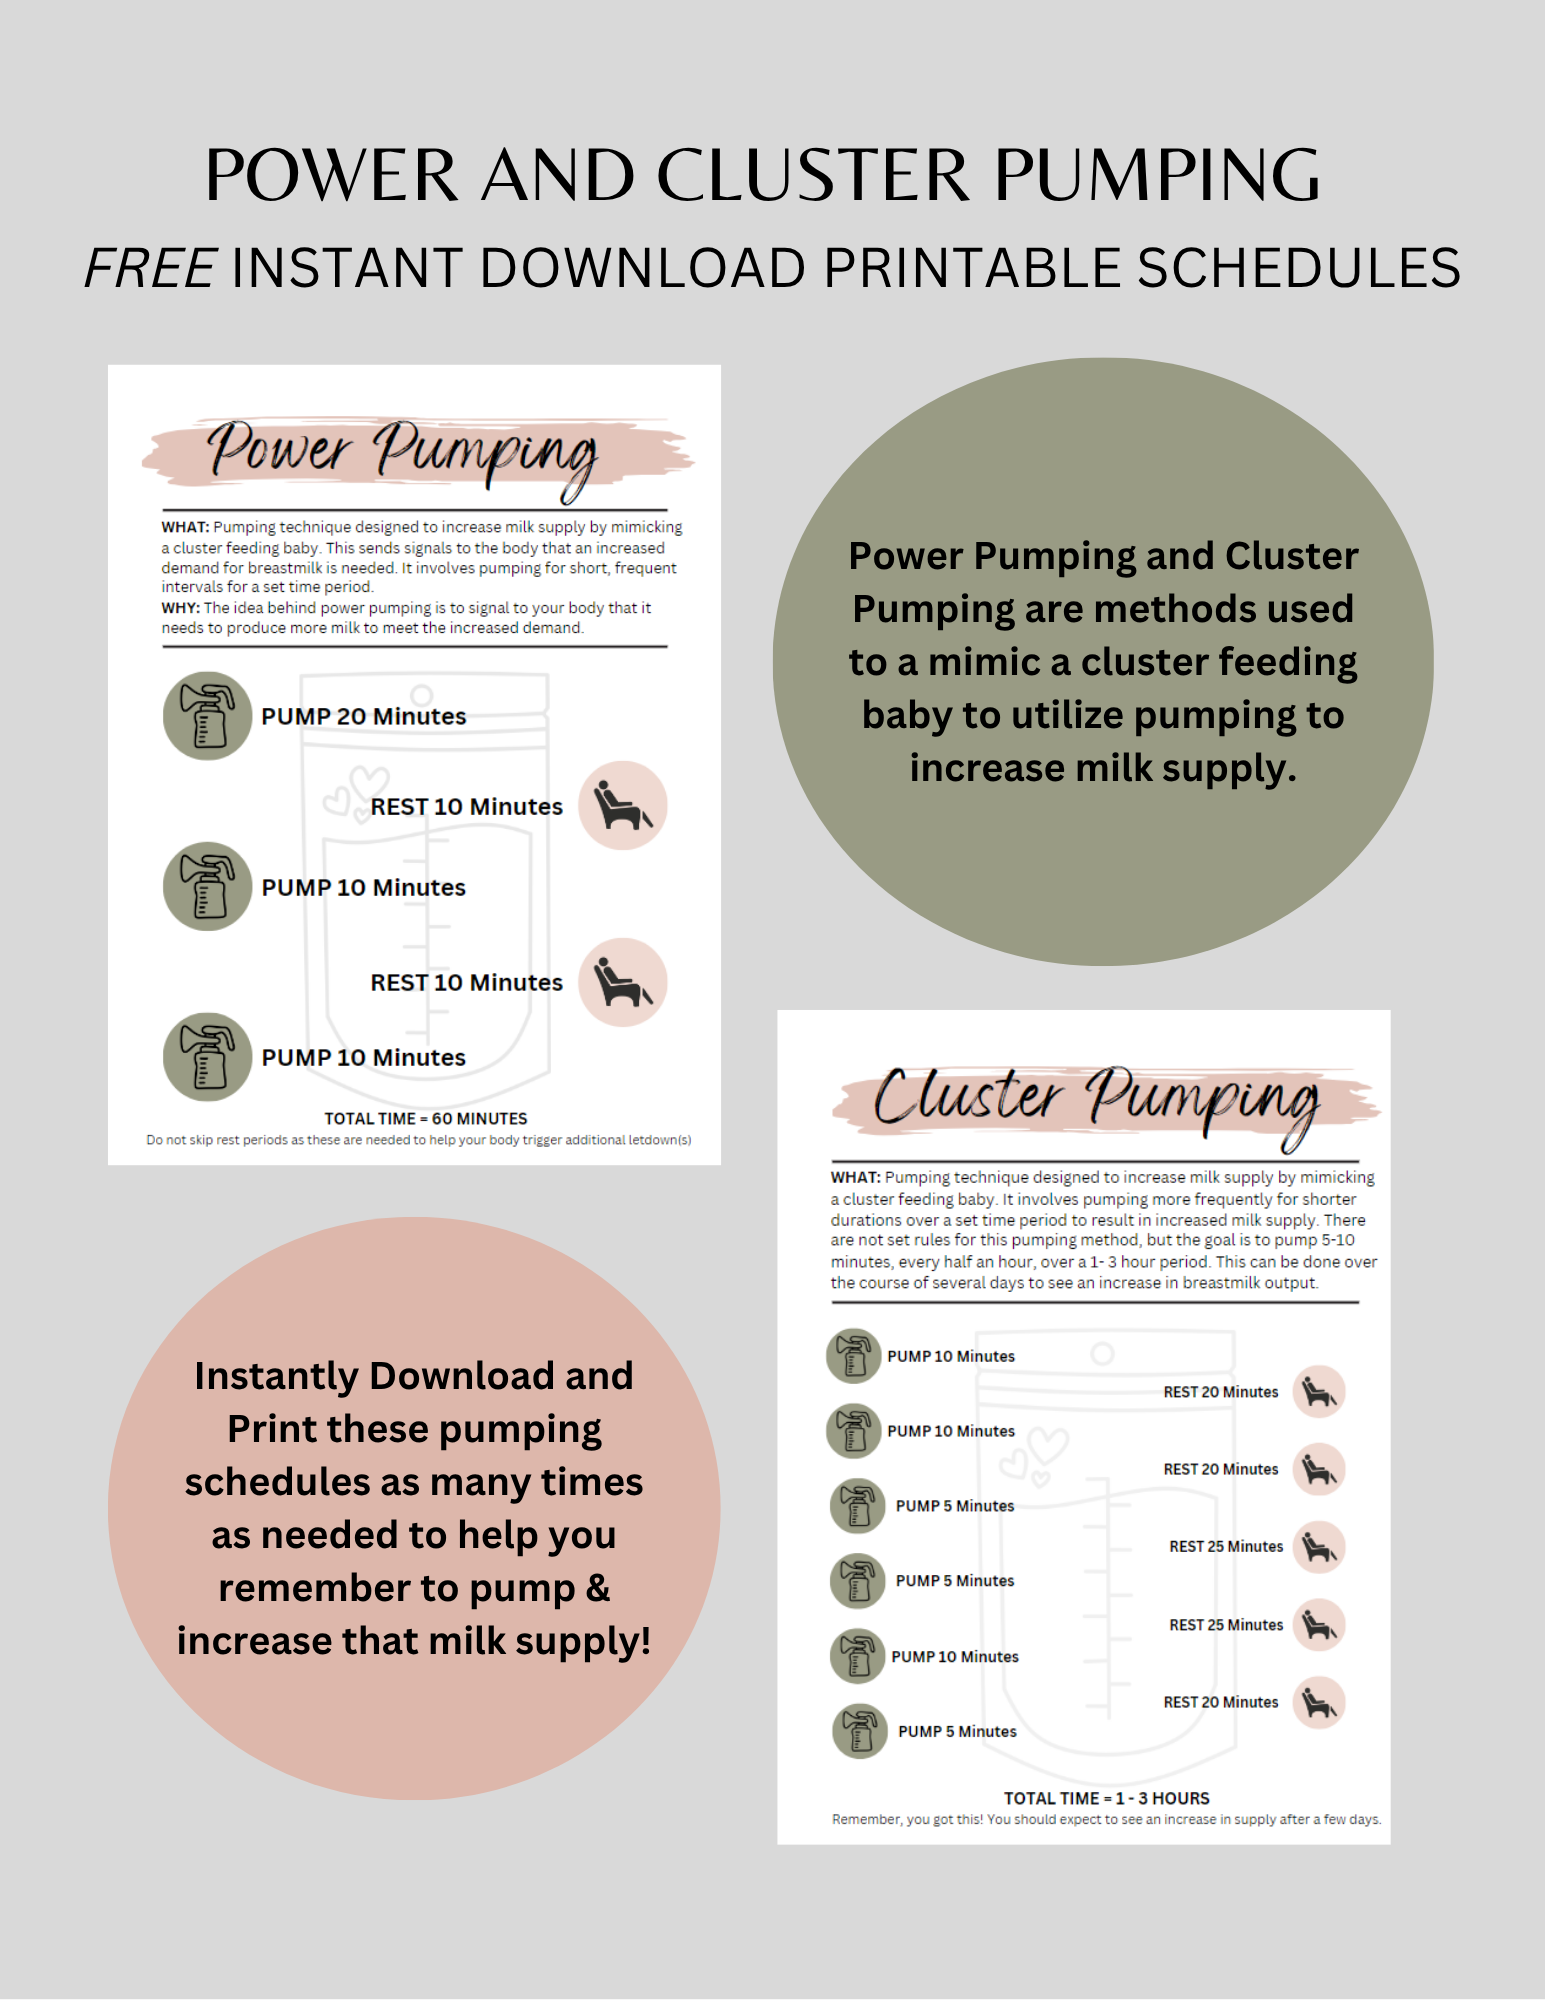
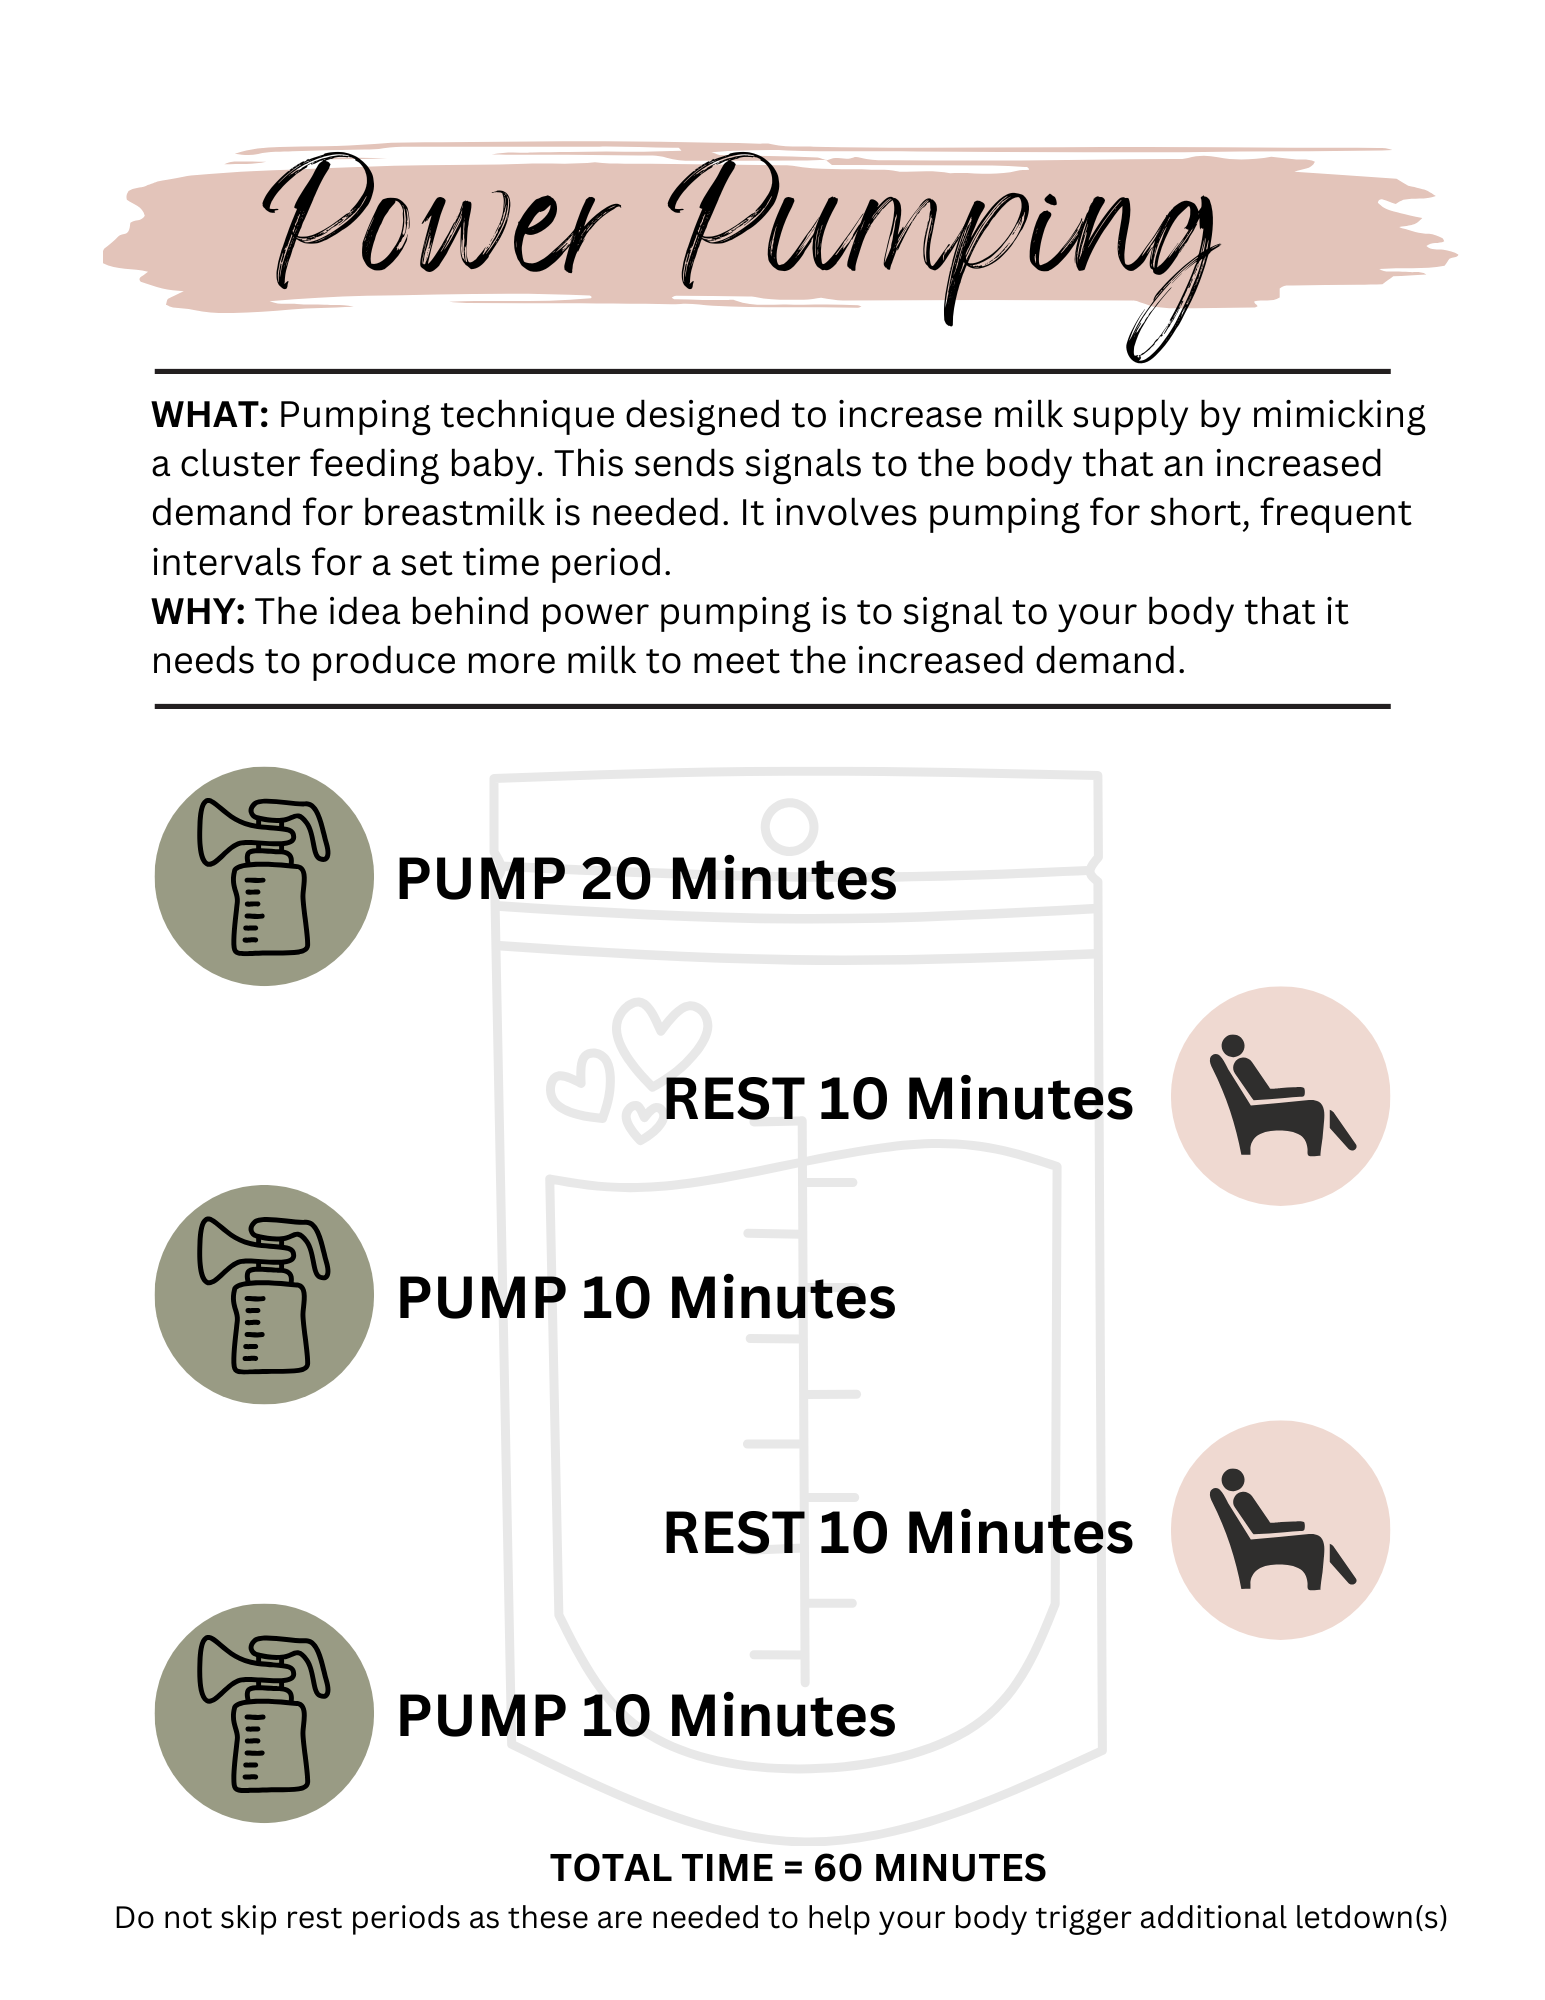
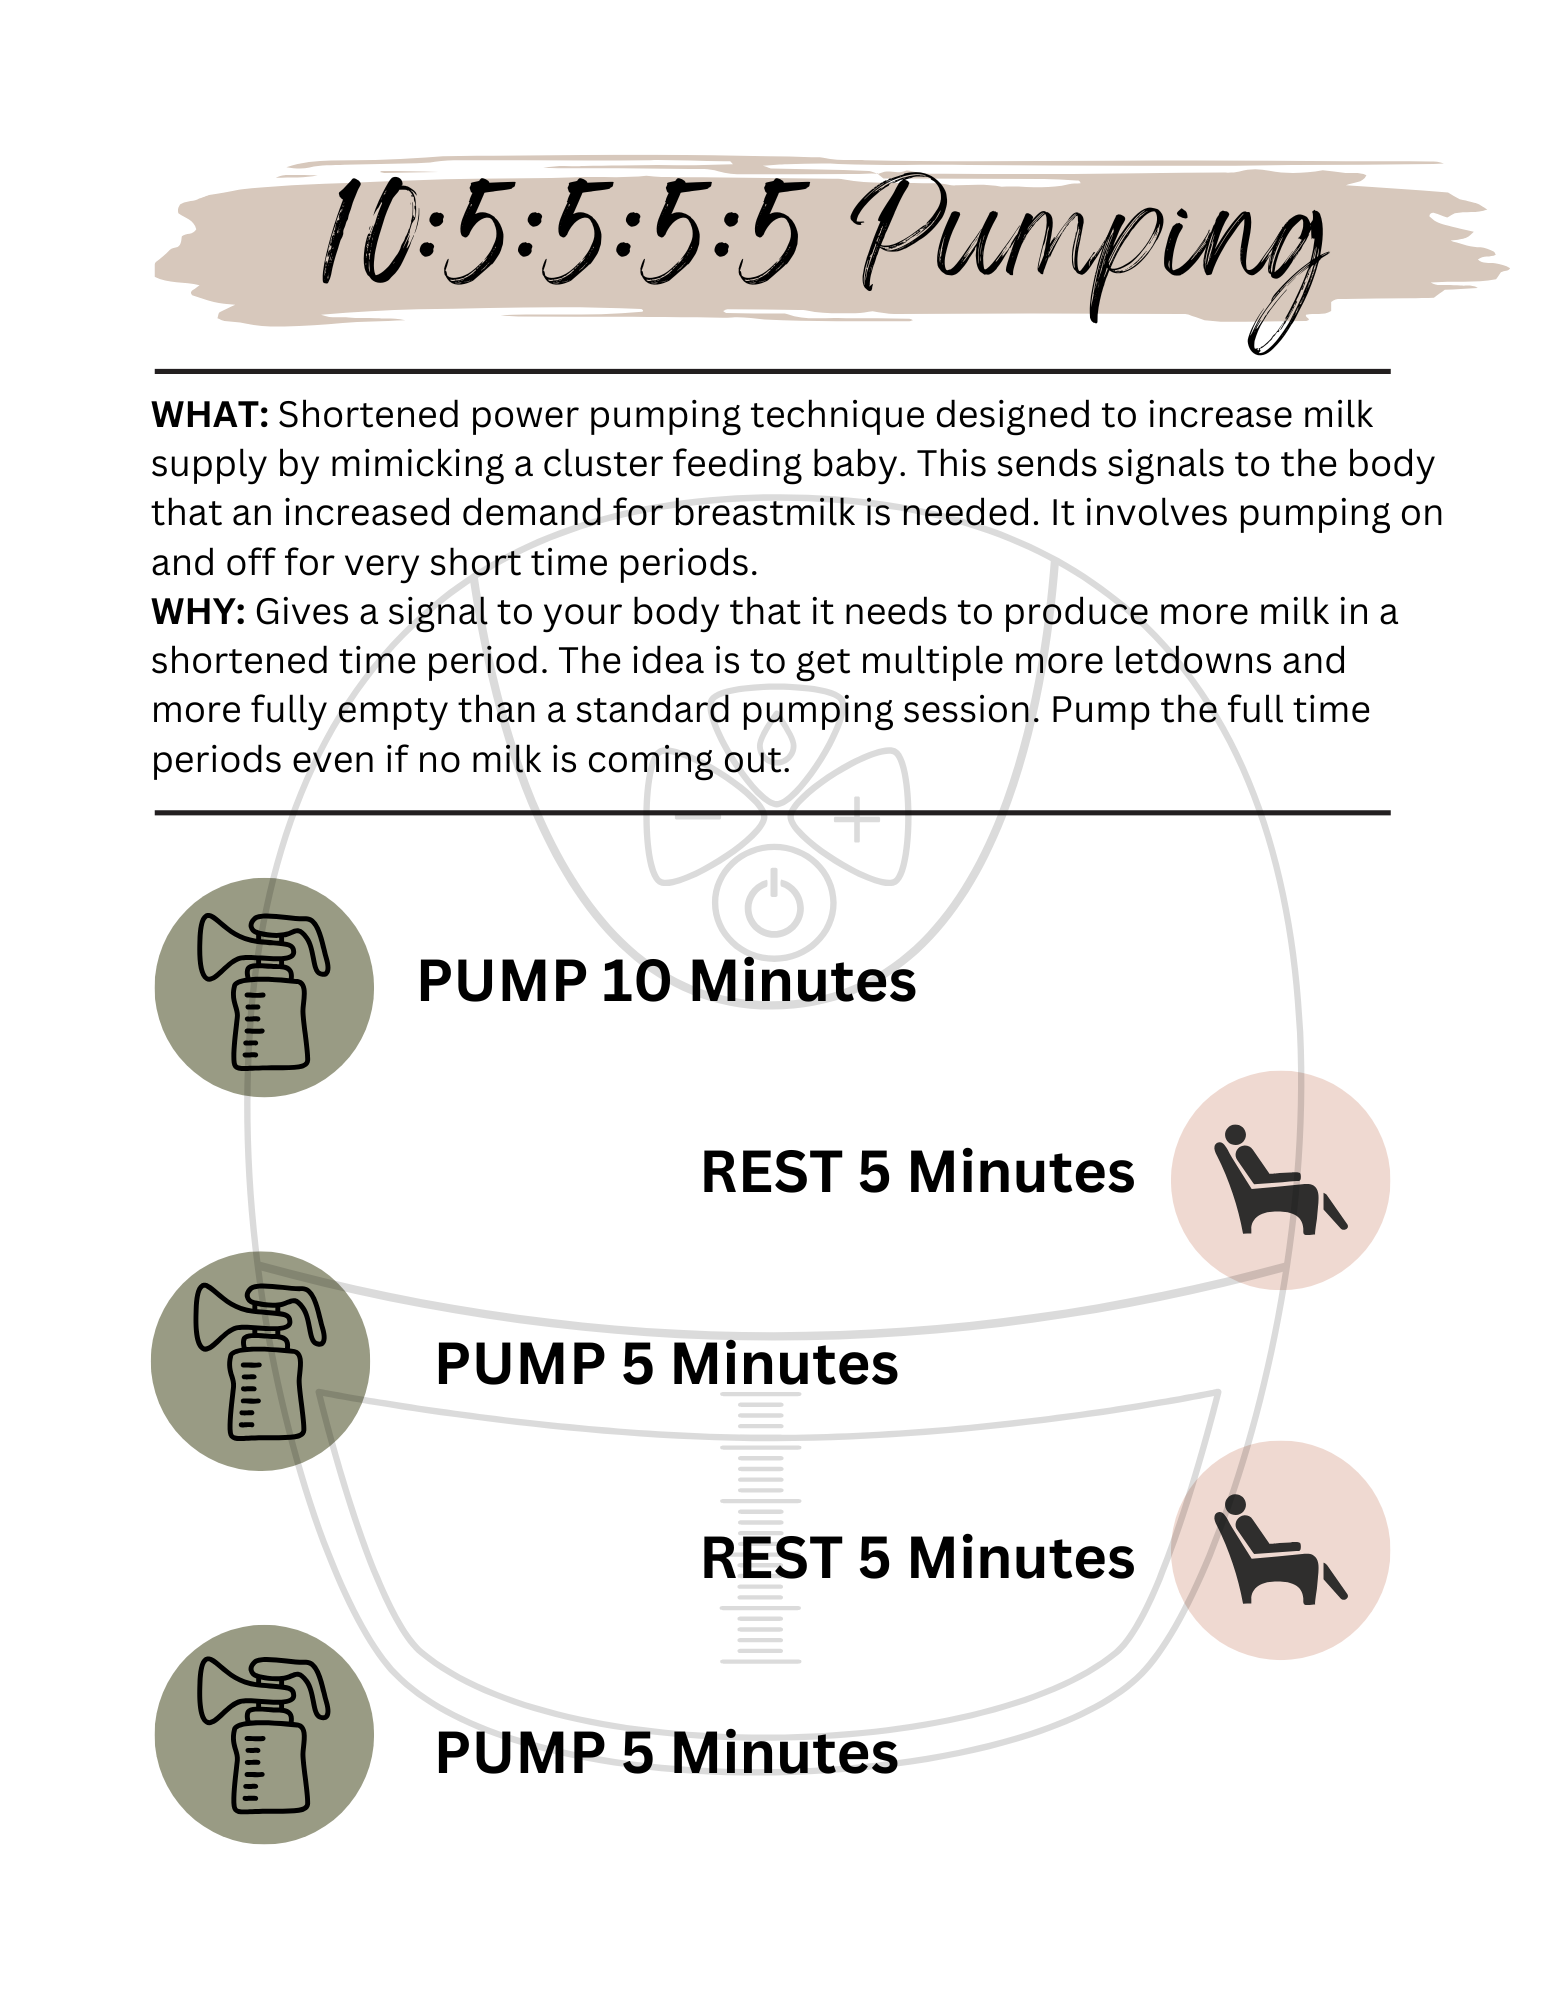
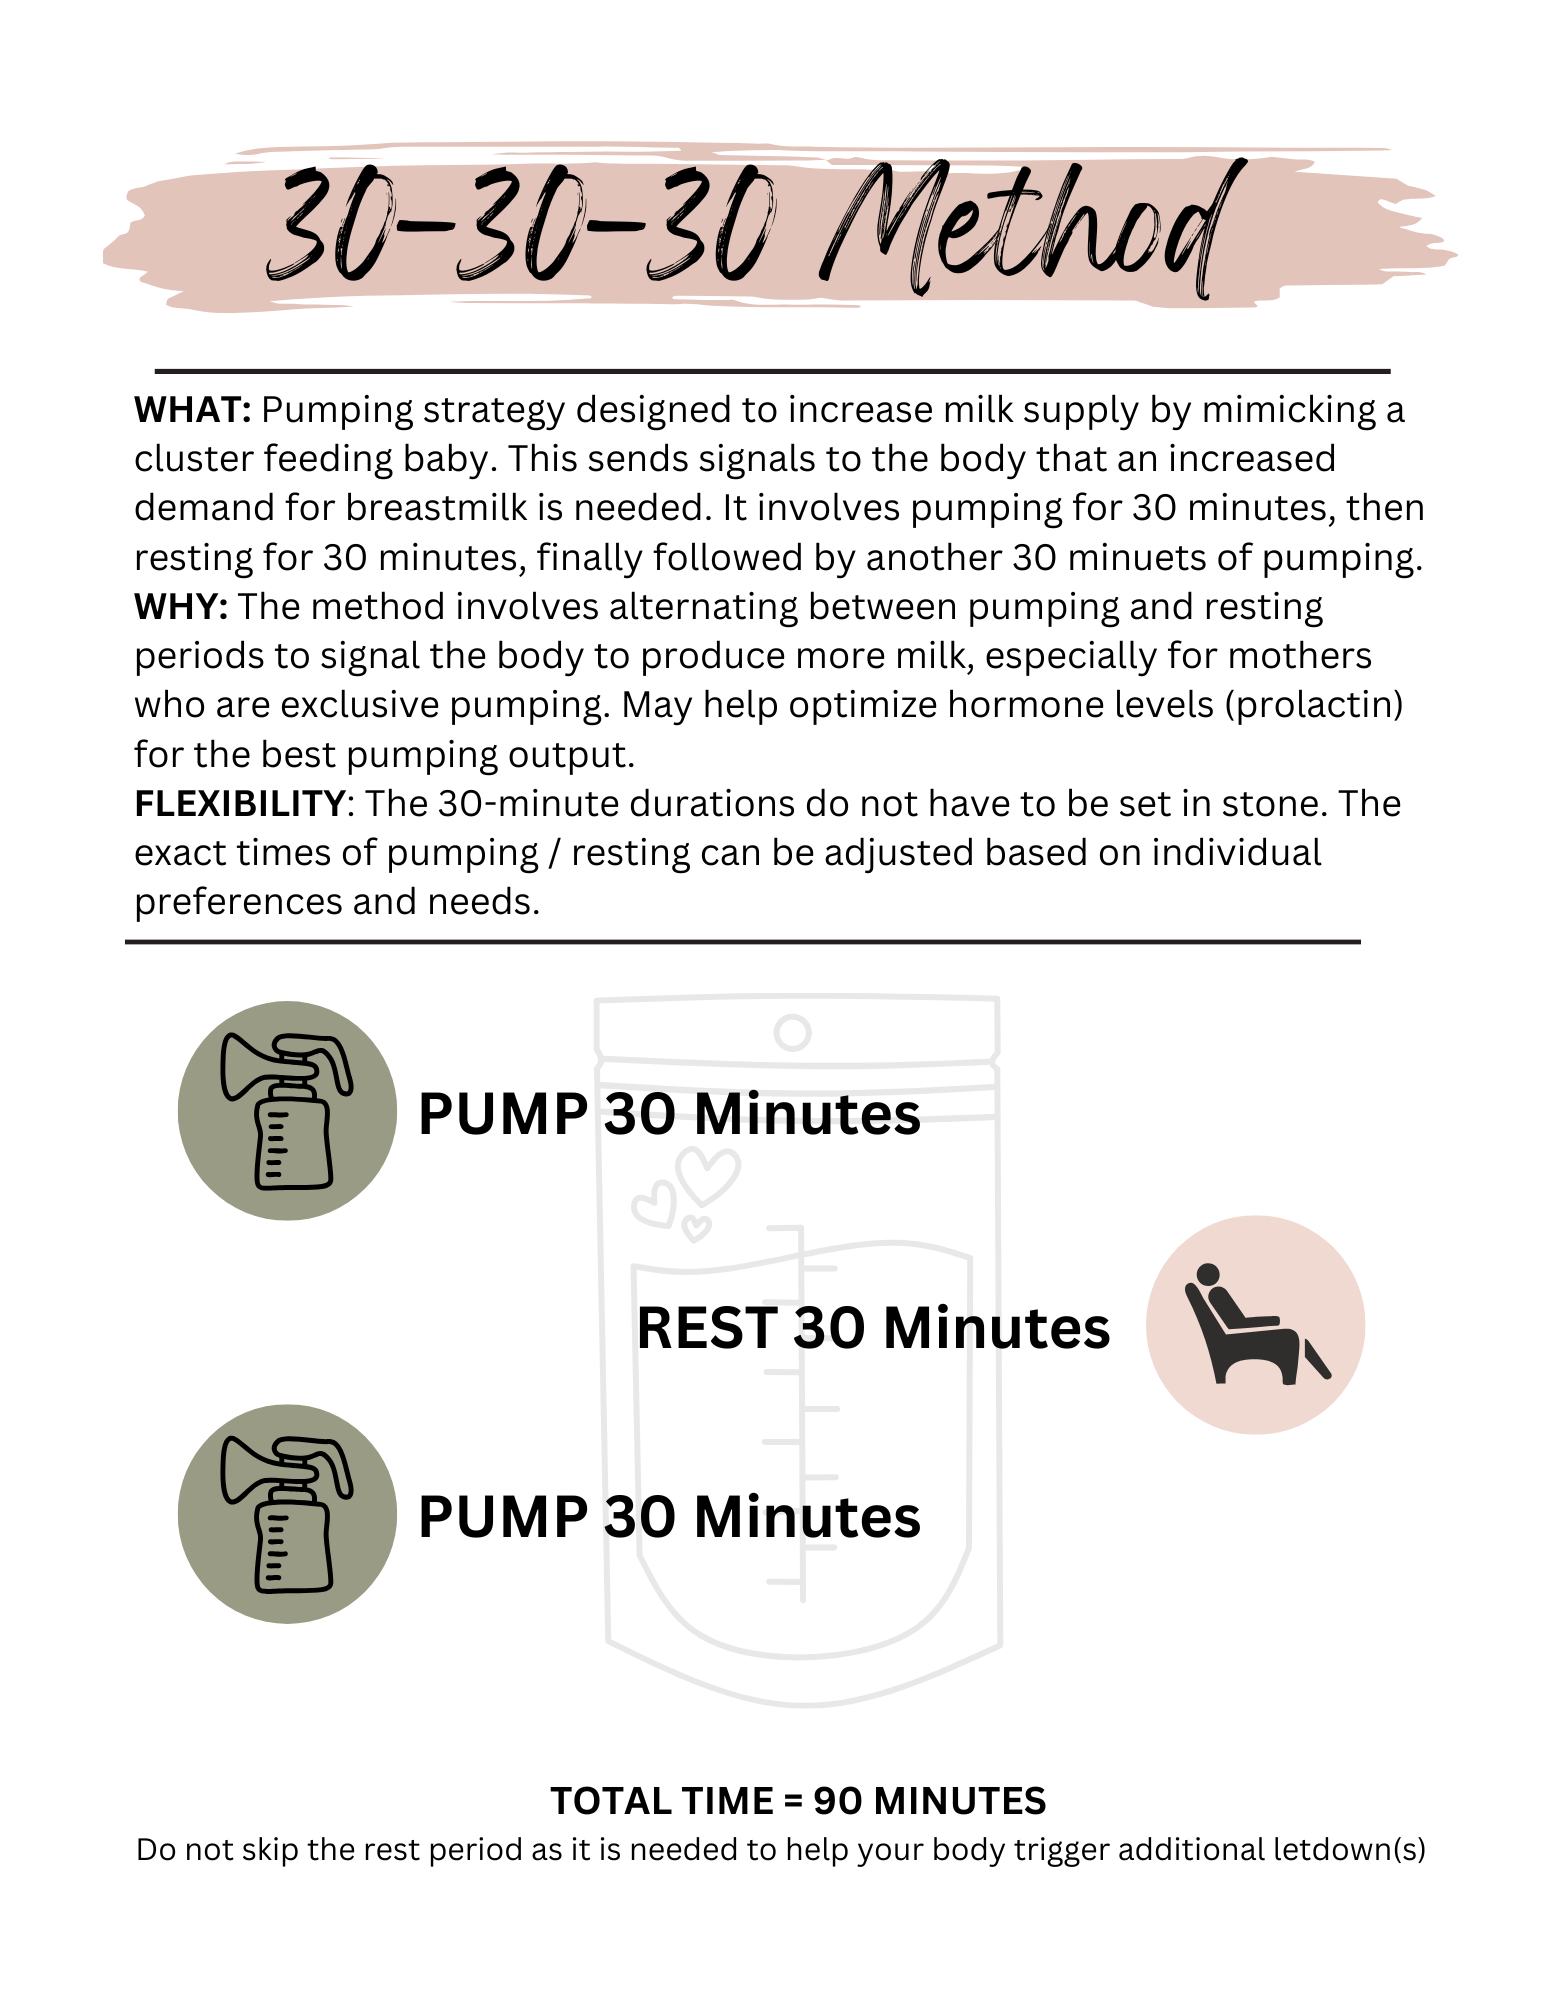
Power Pumping Variations to BOOST Milk Supply
Power Pumping 101: Why It’s Not One Size Fits All 💪🍼
Did you know there are multiple ways to power pump and it’s definitely not a one-size-fits-all method?
Power pumping mimics cluster feeding, a natural process where your baby nurses frequently to signal your body to produce more milk, fast! 🍼✨ But here’s the secret: your best power pumping routine will depend on your schedule, timing, and personal needs .. not a strict set of rules.
If no one has told you yet… it doesn’t have to be exact!
⏱ Pumping 9 minutes instead of 10? Totally fine.
💨 Need to cut it short one day? No problem.
Consistency matters more than perfection.
Try adding power pumping into your daily routine to give your supply a quick boost. Most moms start noticing results within 1–2 weeks, so don’t get discouraged if it doesn’t happen overnight your body’s just catching up! 💕
💡 EXTRA tip: Try power pumping first thing in the morning when your hormone levels are naturally higher, that’s when you’re most likely to get your maximum output!
Short on Time? Same, Mama!
If you can’t “sit around” pumping all day (because, let’s be real, who can?), a wearable pump can be a total game changer.
⭐ Momcozy M6 — super discreet, comfortable, and so effective at an amazing price!
⭐ Momcozy M9 — smart features, adjustable app settings, and built-in modes like “Milk Boost” and “Milk Relief” for effortless sessions.
🌟 BELLPUMP🌟 Promo for all Momcozy pumps on Amzn and Momcozy website! (see buttons below)
Save Big! 💰
Use my codes to save on your favorites:
🌟 BELLPUMP — for all Momcozy pumps
🌟 BELL10 — for the BabyBuddha website only
Power pumping doesn’t have to be stressful, it’s just one more way to work with your body to tell it: “Hey, more milk, please!” 💕
To Download the images below:
On Phone: press & hold on image, then click “save” (to camera roll)
On Computer: Left Click & “save as”
Download and print as needed!

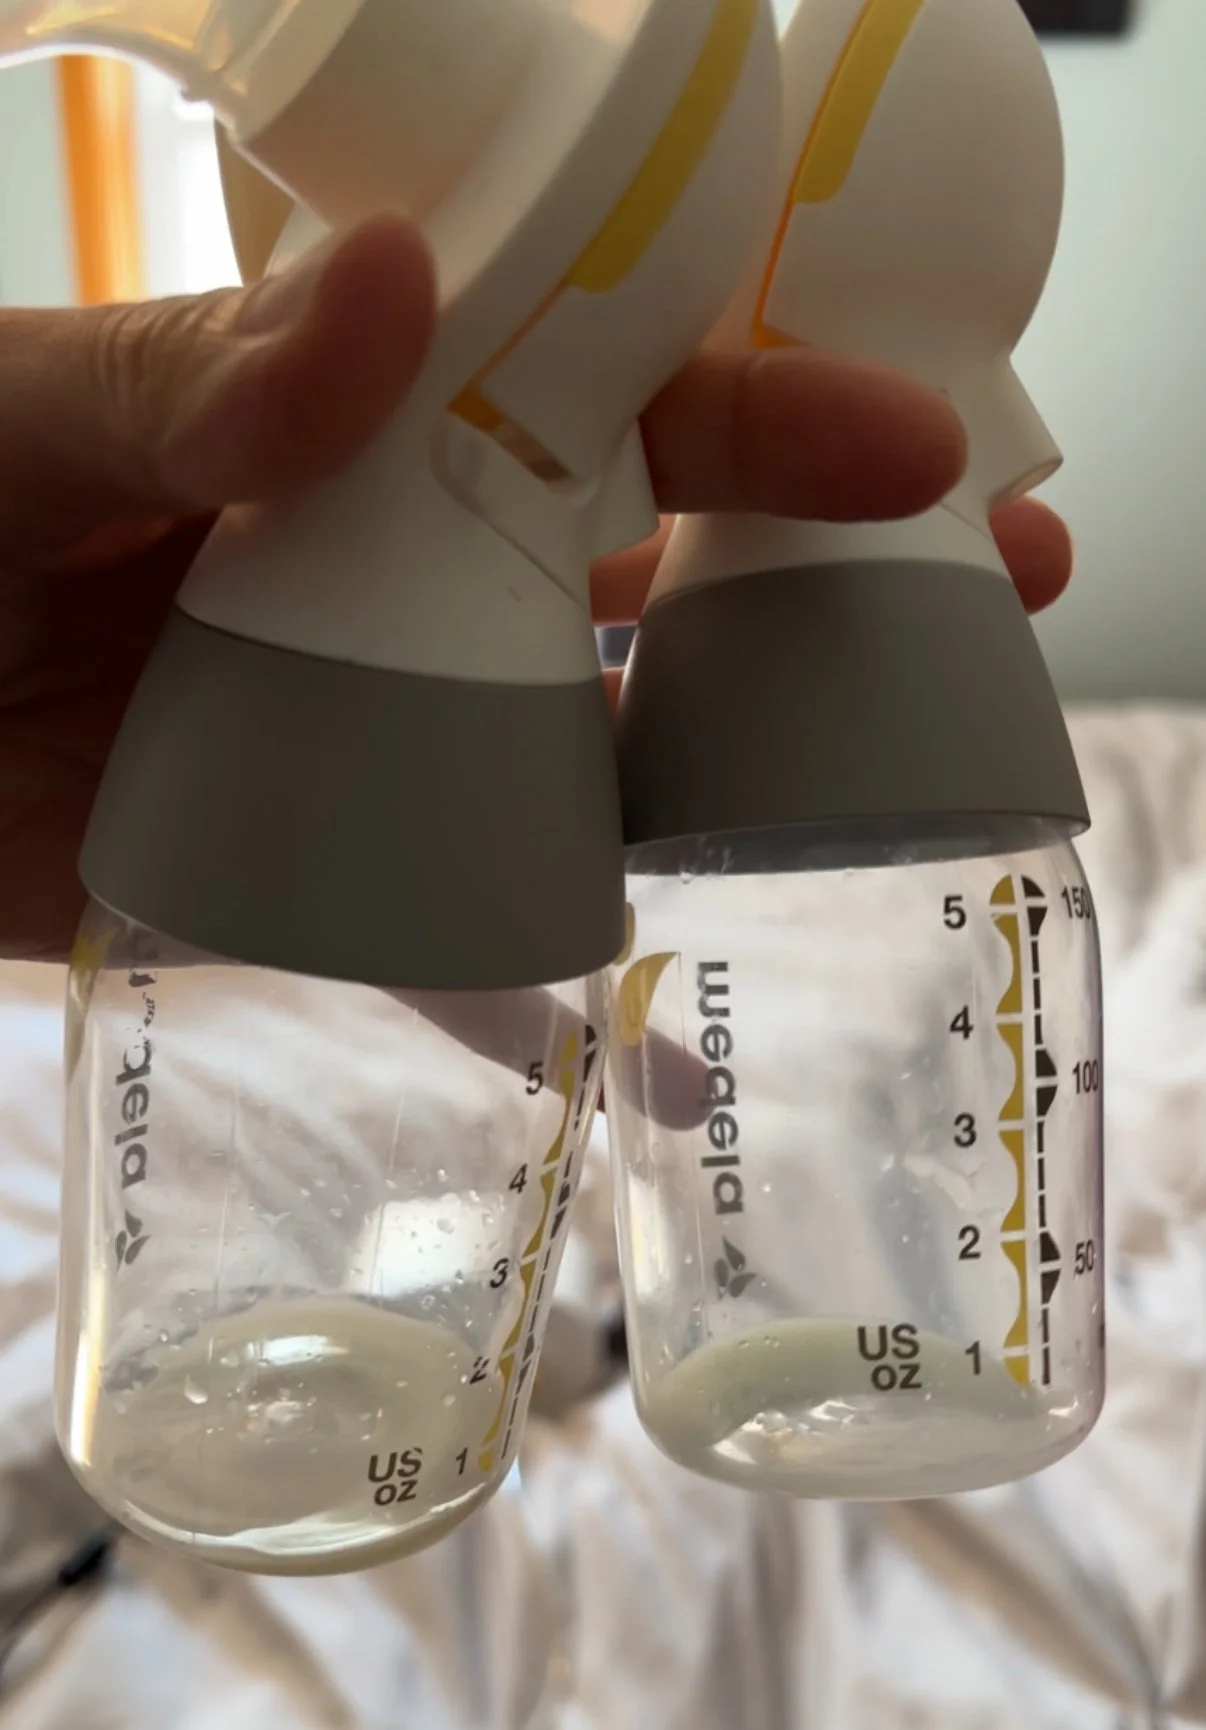
Calories Burned From Pumping Breastmilk Calculation 🤯
If you’ve ever wondered whether pumping breastmilk counts as a workout, the answer is yes! 😂 ..just in its own unique way. Just like nursing, pumping requires your body to use extra energy to produce milk. On average, breastfeeding and pumping moms burn 300 to 600 calories per day depending on milk volume and frequency. That’s why many new moms notice changes in appetite, energy, and sometimes even postpartum weight loss while exclusively pumping or breastfeeding.
But how do you actually calculate the calories burned from pumping breastmilk? The key factor is milk output. Research suggests that producing 1 ounce of breastmilk burns about 20 calories. So, if you pump 25 ounces in a day, that’s roughly 500 calories burned (PLUS include an efficiency factor and it is even higher). Of course, every mom’s body is different: metabolism, supply, and pumping frequency all play a role in how much energy is used.
For exclusive pumping moms, understanding this calculation can be especially helpful. Not only does it help explain why you feel hungry after a long pumping session, but it also reinforces the importance of eating enough nutrient-dense foods. Adequate calories, hydration, and protein are essential for maintaining milk supply and keeping your energy levels up, no matter if you are nursing or pumping. Tracking both your output and your nutrition can give you a better picture of how your body is working hard to fuel your baby and your recovery.
Whether your goal is to support weight loss, maintain your milk supply, or simply better understand what your body is doing, knowing the calories burned from pumping breastmilk is eye-opening. Each ounce pumped is not just food for your baby.. it’s proof of the energy your body is investing into motherhood. By fueling yourself well, you’ll have the strength and energy to keep up with both your pumping schedule and your little one’s growing needs.
FULL calculation info and how-to below, but remember this is not exact and just for fun and knowledge! The most important thing is to nourish your body to support your needs and that of your baby. Eat intuitively, and keep on your pumping schedule!

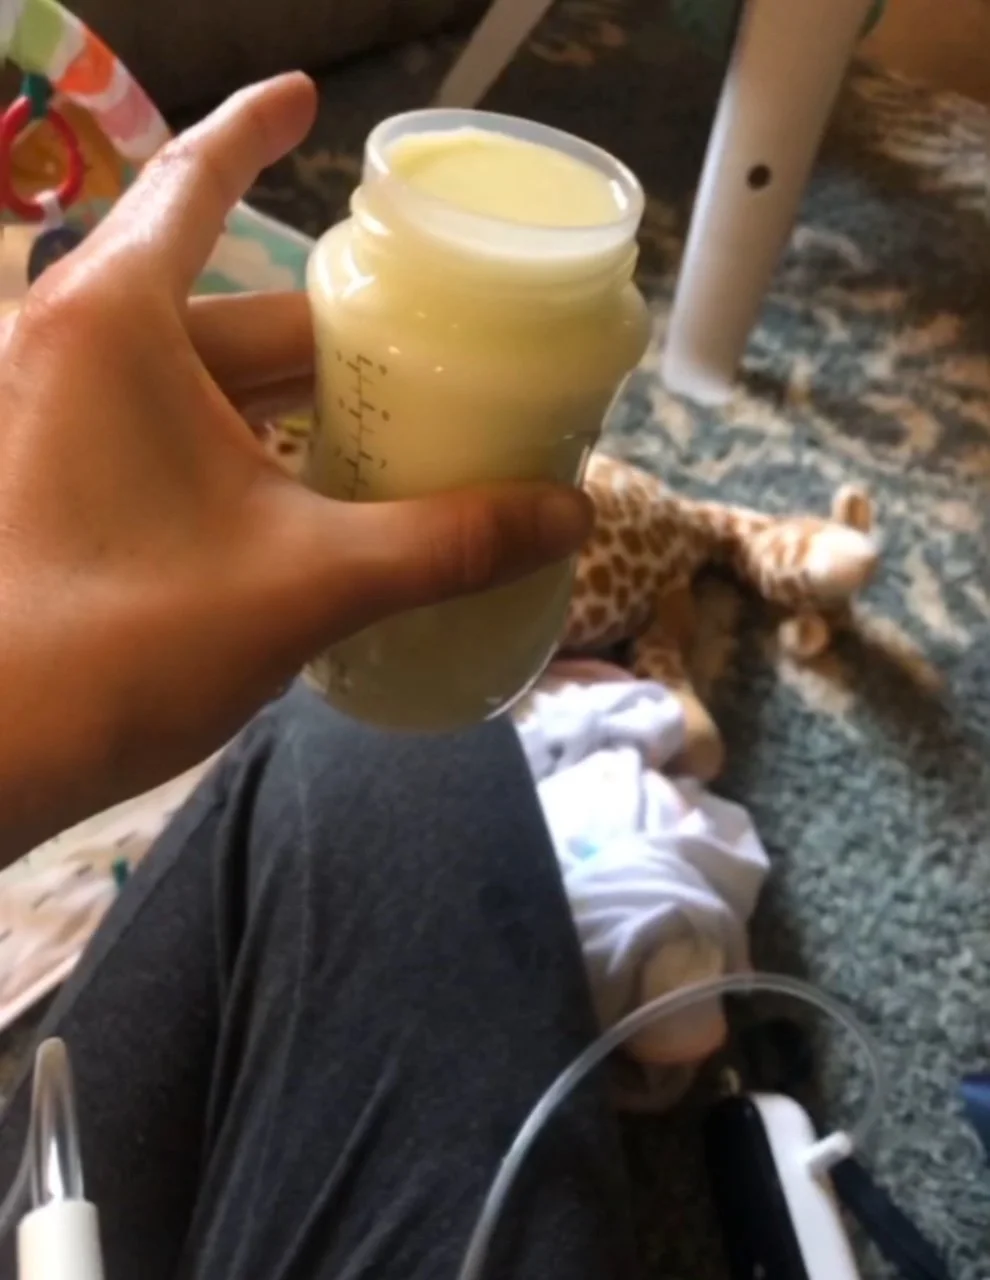
My Turning Point With Pumping & How I Got There
In 8 weeks I went from this… TO THIS!!! By Changing this..
I thought it was “just me” and my body… At 5 weeks postpartum, I was told “your milk supply is gone” and “we can no longer keep trying exclusively nursing, you need to start formula right away.” Yes, we had struggled with latch, painful nursing, and poor weight gain but overall, I thought we were improving day by day. That’s when my doctor told me my breastfeeding journey was over.
Instead of giving up completely, I started triple feeding: pumping, still trying to latch baby occasionally, and giving formula supplements. I dove headfirst into researching pumping like crazy, desperate to find any tip, schedule, or hack that could make a difference. I tried everything out there, and eventually I found a few things that actually worked.
It wasn’t easy, there were tears, late-night pumping sessions, and moments when I felt like quitting. But slowly, ounce by ounce, my supply started coming back. And the best part? I proved to myself that it wasn’t just me .. my body was capable, it just needed the right support. It took time and determination, but it was so worth it! These are the top tips that really helped me, and I hope they help you too 🤍🤍🤍
One of my TOP Questions…
“What Pump Did You Change To?”
The BabyBuddha! A portable, strong and efficient pump that can be used as a main pump. I bought this with my own money (off a recomendation from YouTube..) and stopped using my free insurance provided wall pump.
SAVE $$ on the BabyBuddha With “BELL10” promo. This is a must try for mamas who want to increase milk supply, have flexibility and portability.. The one I recommend to my best friends, sister and YOU :)
2. The Momcozy M5! My must-have secondary pump that provides all the discreetness, on the go pumping and flexibility of a wearable pump with great suction and WITHOUT the high price tag! This one is the best price from Amazon and “BELLPUMP” will save extra off of the Amazon promo price!
“BELLPUMP” saves an extra 10% on all momcozy pumps on Amazon or momcozy.com!
Find More Info in “SHOP” at top of page and the “Complete Pumping Guide”

![1[1].png](https://images.squarespace-cdn.com/content/v1/6883ba39c53b467456ded374/1758210610248-U8ZIB23PKTTNYCA0ZJOK/1%5B1%5D.png)
![3[1].png](https://images.squarespace-cdn.com/content/v1/6883ba39c53b467456ded374/1758210653953-729WX3AM8BBNOM4HD2Y6/3%5B1%5D.png)


CDC vs. ABM: Which Breastmilk Storage Guidelines Should Moms Follow?
If you’ve ever Googled “how long is breastmilk REALLY good for?” and walked away more confused than before.. you’re not alone. The Centers for Disease Control and Prevention (CDC) and the Academy of Breastfeeding Medicine (ABM, Protocol #8) give different answers about safe storage timelines. 🤯
So which one should you follow? Let’s break it down.
Here’s a side-by-side look at the CDC vs. ABM recommendations:

Storage Method, CDC Guidelines, and ABM (Protocol #8) Guidelines. It outlines safe breast milk storage times across different conditions. Fresh breast milk at room temperature (77°F/25°C or cooler) is safe for up to 4 hours per CDC, while ABM allows up to 6–8 hours in very clean conditions. In a cooler with ice packs (59°F/15°C or colder), both recommend up to 24 hours. Refrigerated breast milk (39°F/4°C or colder) is safe up to 4 days per CDC, with ABM noting up to 5–8 days if collected under very clean conditions. Frozen breast milk (0°F/-18°C or colder) is best used within 6 months but acceptable up to 12 months according to both sources. Thawed breast milk kept in the fridge is safe for up to 24 hours. Breast milk left in a bottle after baby drinks should be used within 2 hours per CDC or 1–2 hours per ABM.
Why They Differ
CDC gives the most conservative timelines to cover all situations, even when milk may not be stored under ideal conditions.
ABM offers extended timelines if you’re pumping and storing milk with very clean hands, sanitized pump parts, and quick refrigeration.
That’s why moms often hear two different answers depending on the source! There are even more recommendations with the USA like the American Academy of Pediatrics (AAP) and other organizations all over the world.
How to Decide What Works for You
If your baby is preemie, immunocompromised, or high-risk, stick with CDC’s stricter guidelines.
If you have a healthy, full-term baby and practice excellent pump and storage hygiene, you may feel comfortable with ABM’s extended timelines.
Always trust your instincts, if milk smells sour or off, toss it.
If you’re using the fridge hack or adding freshly pumped milk to milk that’s already been chilled, you may want to stick to the stricter CDC guidelines.
Free Printable Storage Guide
Want a fridge-ready cheat sheet? I’ve made a one-page printable of the CDC guidelines so anyone helping you with bottle feeding knows exactly how long milk can be safely stored.
Grab below and share for more!
Let’s Be Friends on Instagram! Check out the full video with the link below.

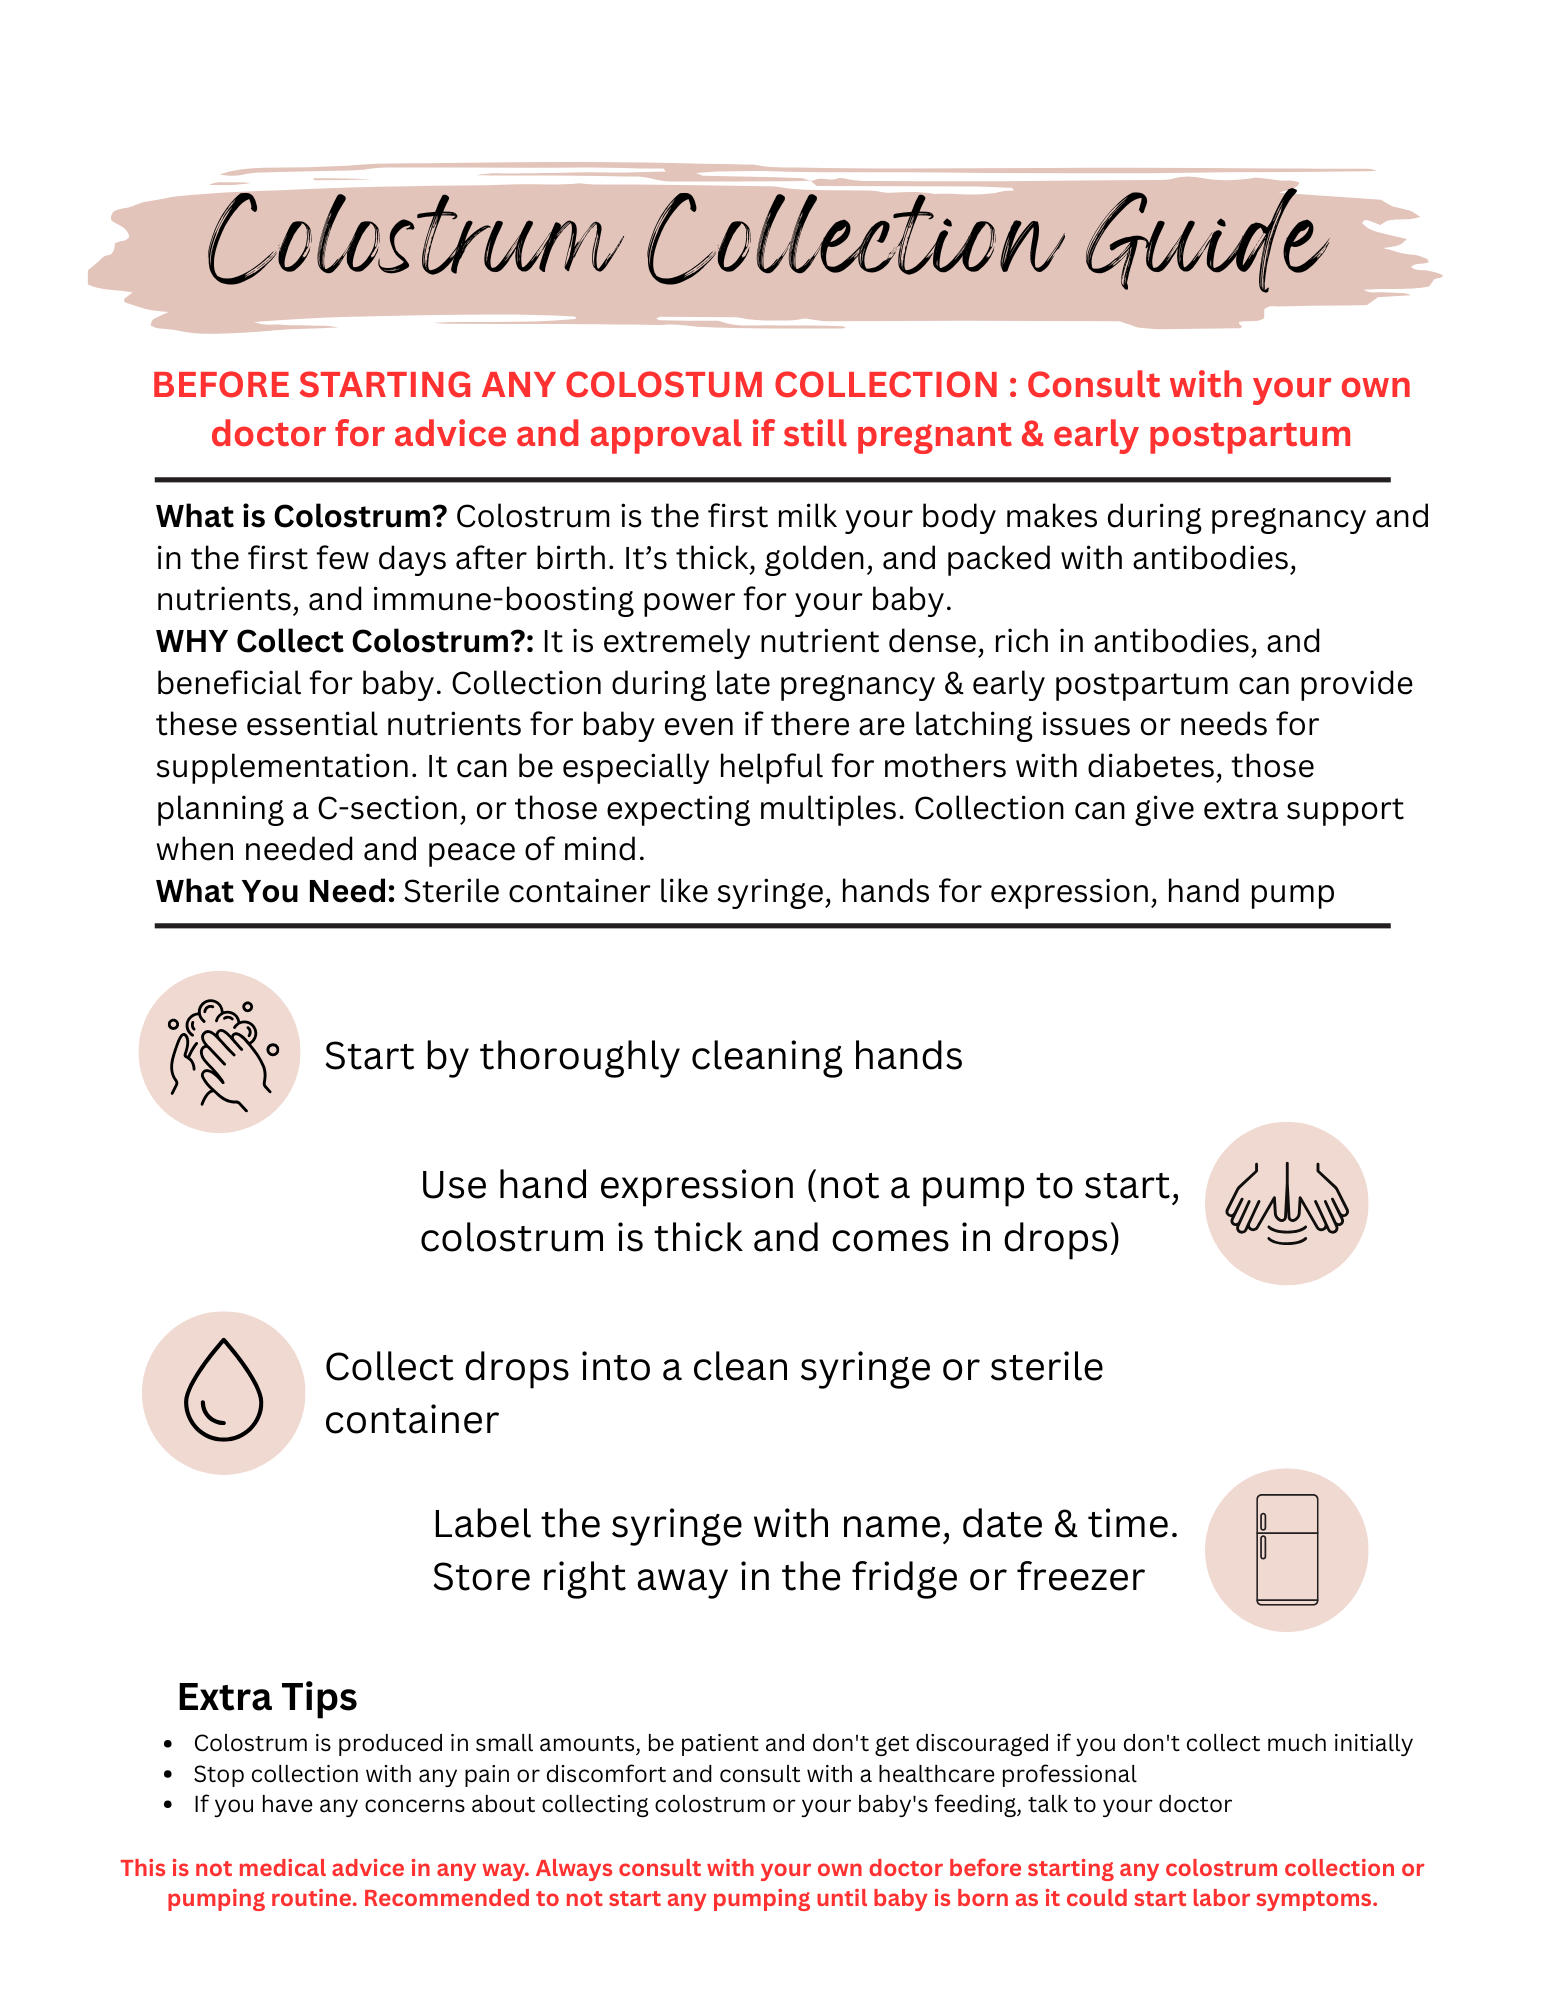
My Journey Collecting Colostrum Starting at 37 Weeks Pregnant
With my second pregnancy, I knew I wanted to prepare a little differently than I had the first time around. With my first baby, I had trouble latching, pain with breastfeeding, and my baby had extremely poor weight gain his first month of life. This is why I asked my doctor at 37 weeks pregnant with my second if I was cleared to start colostrum collection. I got the OK due to my low risk pregnancy and previous birth history. Once I received approval, I began hand-expressing and saving that “liquid gold” for my newborn.
What is Colostrum?
Colostrum is the very first milk your body makes during pregnancy and in the first few days after birth. It’s usually thick, golden, and nutrient-dense. I like to call it a “superfood for babies” because it’s packed with antibodies, proteins, and immune-boosting power. Even just a few drops can do amazing things for a baby’s health.
Why I Decided to Collect Colostrum Before Birth
For me, colostrum collection was about peace of mind. With my first baby, I had a tough start to breastfeeding and remember the stress of worrying if my baby was getting enough. This time, I wanted to be prepared. Having a small stash meant that if my new baby had any latching issues, low blood sugar, or needed extra supplementation, I’d already have nutrient-rich colostrum ready.
It can be especially reassuring for moms with certain situations like gestational diabetes, planned C-sections, or multiples. For me personally, it was about giving myself (and my baby) a little extra support right from the start.
How I Collected Colostrum
Here’s what I did each session:
Washed my hands thoroughly.
Gently hand-expressed instead of using a pump (colostrum is thick and comes in drops, not streams).
Collected each drop into a sterile syringe or container.
Labeled the syringe with my name, the date, and time (Follow CDC breastmilk storage guidelines)
Stored it immediately in the fridge or freezer.
The first few times I only got a drop or two, and that’s completely normal! Colostrum is produced in very small amounts, and every single drop counts.
Important Things I Learned
Always check with your doctor before starting. Pumping or expression in pregnancy may cause contractions, so I only started after my provider gave me the green light.
Be patient: it can take practice and may feel slow at first.
Stop if you ever feel pain or discomfort.
- When I first started, I was doing only hand expression into a small pre-sterilized vile. It was only drops at a time for the first week.
- The second week, I used again hand expression, and addition of a manual pump. I started to get more colostrum collected at this time, again using tiny vials that were pre-sterilized and could be frozen.
-At 39 weeks, I used hand expression, manual pump, and a wearable pump. I started to get out even more, especially with the wearable pump! I froze the collected colostrum to have ready anytime baby would get sick, or if baby had low blood sugar, or issues latching like I had with my first baby.
My baby arrived at 39 wk 6 days naturally and without induction! Luckily, my second baby had a better latch than my first and I continue to work on directly nursing🤱🏻 I would harvest colostrum during that first week after nursing to store extra however I could (wearable pumps and manual pump). I have since used colostrum as a first line of defense against any illness, for eczema skin care, treatment for eye irritation, as a supplement while I was at work, and some was donated!
This journey was amazing for me! But remember, it’s not for everyone and it’s a must to talk with your doctor or midwife before starting ✨🤍
—————————————————————————————————————————————————————————————————————————————
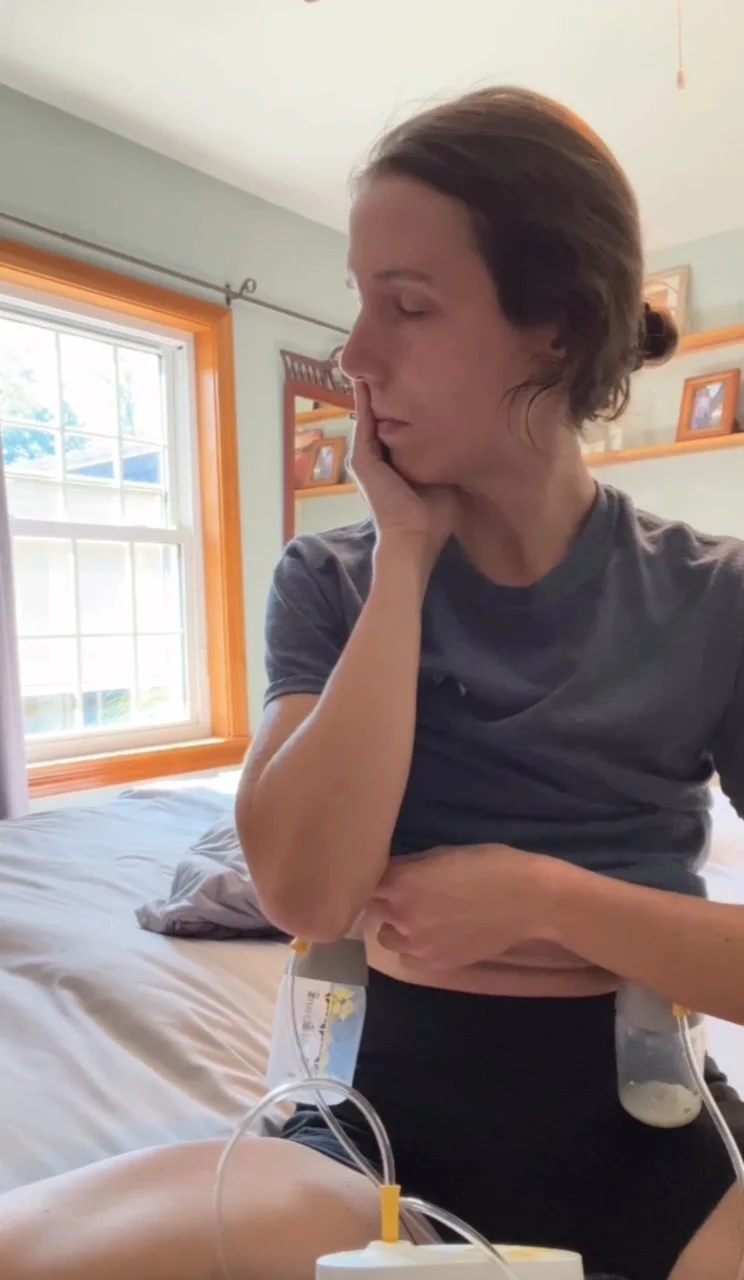
One of the BEST things I did to make pumping easier with a baby is use a wearable pump! I would highly recommend the momcozy M5: it is discreet, easy to use, and always gives me great output!
SAVE $$ with PROMO ✨ BELLPUMP ✨ on all momcozy pumps on Amazon or momcozy website. See my full list below 👇
Remember: This is not medical advice, just my personal experience. Always consult your own doctor for what’s right for you.
August is World Breastfeeding Month!
Happy World Breastfeeding Month!
Honestly - breastfeeding and formula feeding aren’t the same experience for new moms. Feeding your baby in any form is incredible, but growing milk with your own body (pumping, tube feeding or nursing)? That’s next level.
Breastfeeding means your baby relies on you: your time, energy, body, nutrition and calories. It means chugging water, eating enough calories, and still pushing through mastitis, clogged ducts, soaked shirts, and the anxiety of nursing in public.
Some moms pump or nurse until it hurts. Some nurse through tongue ties, latch issues, and total exhaustion. Some wake every 90 minutes just to protect their supply. Some moms planned to only nurse and switched to pumping not by choice. Some moms overcome low milk supply, while some make just enough and some combo feed with however much breastmilk they can make, because all are powerful!
This is not for comparison, but to honor the invisible, exhausting, beautiful effort that goes into breastfeeding.. whether you did it for a day, a month, or several years.
That’s what this week is about:
Raising awareness. Offering support. Celebrating the mothers who gave so much of themselves.
If that is you - YOU have done incredible things for your baby and yourself, offering incredible benefits to last a lifetime💛
HOW TO CELEBRATE??
Make a Breastmilk Keepsake: Turn your liquid gold into a lasting memory! Order or DIY a keepsake like breastmilk jewelry, soap, or lotion. It’s a beautiful way to honor the time, energy, and love you’ve poured into your feeding journey.
Share Your Story: heartfelt post, funny reel, or blog entry: use your voice. Share your breastfeeding journey on social media. Be real. Be raw. You never know who you might inspire or encourage by opening up.
Support Another Mom: Offer your help and invaluable advice! Drop off a snack box, send a supportive message, or share your favorite breastfeeding tips and products. Sometimes, one kind word can make a huge difference.
Donate Breastmilk or Supplies: If you have extra milk, consider donating to a milk bank or another mom in need. Not a milk donor? You can still help by donating unused breast pump parts, nipple creams, or lactation teas to moms or shelters.
Host a “Milk Mama Meetup”: Connection is key! Meet with local mamas in a breastfeeding or pumping support group for a casual coffee date, park picnic, or virtual Zoom chat. Share your journeys, laugh about the leaks, and connect over the ups and downs of breastfeeding.
Simple Celebration of Yourself! Reminisce on your journey so far, write a journey entry for yourself to look back on and read later. Take a picture of your journey for yourself. Grab a special treat to celebrate everything you have done so far!

Breastmilk Lotion Recipe & Video
Do NOT waste that precious 🌟liquid gold 🌟
Did you know that breastmilk is amazing not only for baby’s food but for baby’s skin as well? This can be made with fresh or frozen milk, even that milk that is getting a little “too old” to feed to your baby or toddler.
This breastmilk lotion is easy to make (only took me 10 minutes and one container), contains minimal ingredients, and can be long lasting with proper storage!
Here’s what I used in my lotion:
🍼 4 oz breastmilk
🐝 1 TBS beeswax
💧4 drops vitamin E oil
🥥 4 oz coconut oil or grape seed oil
🪻Essential oils (optional - I omitted due to sensitive skin)
FULL Video and recipe below: https://www.instagram.com/reel/DM8HVJ0uAp_/
Amazon Lotion Items: https://amzn.to/45ynR1H

FULL recipe and ingredient replacement options for homemade breastmilk lotion.
* ALWAYS check with your own doctor for any questions, advice or before starting any new lotion or remedy for your child.
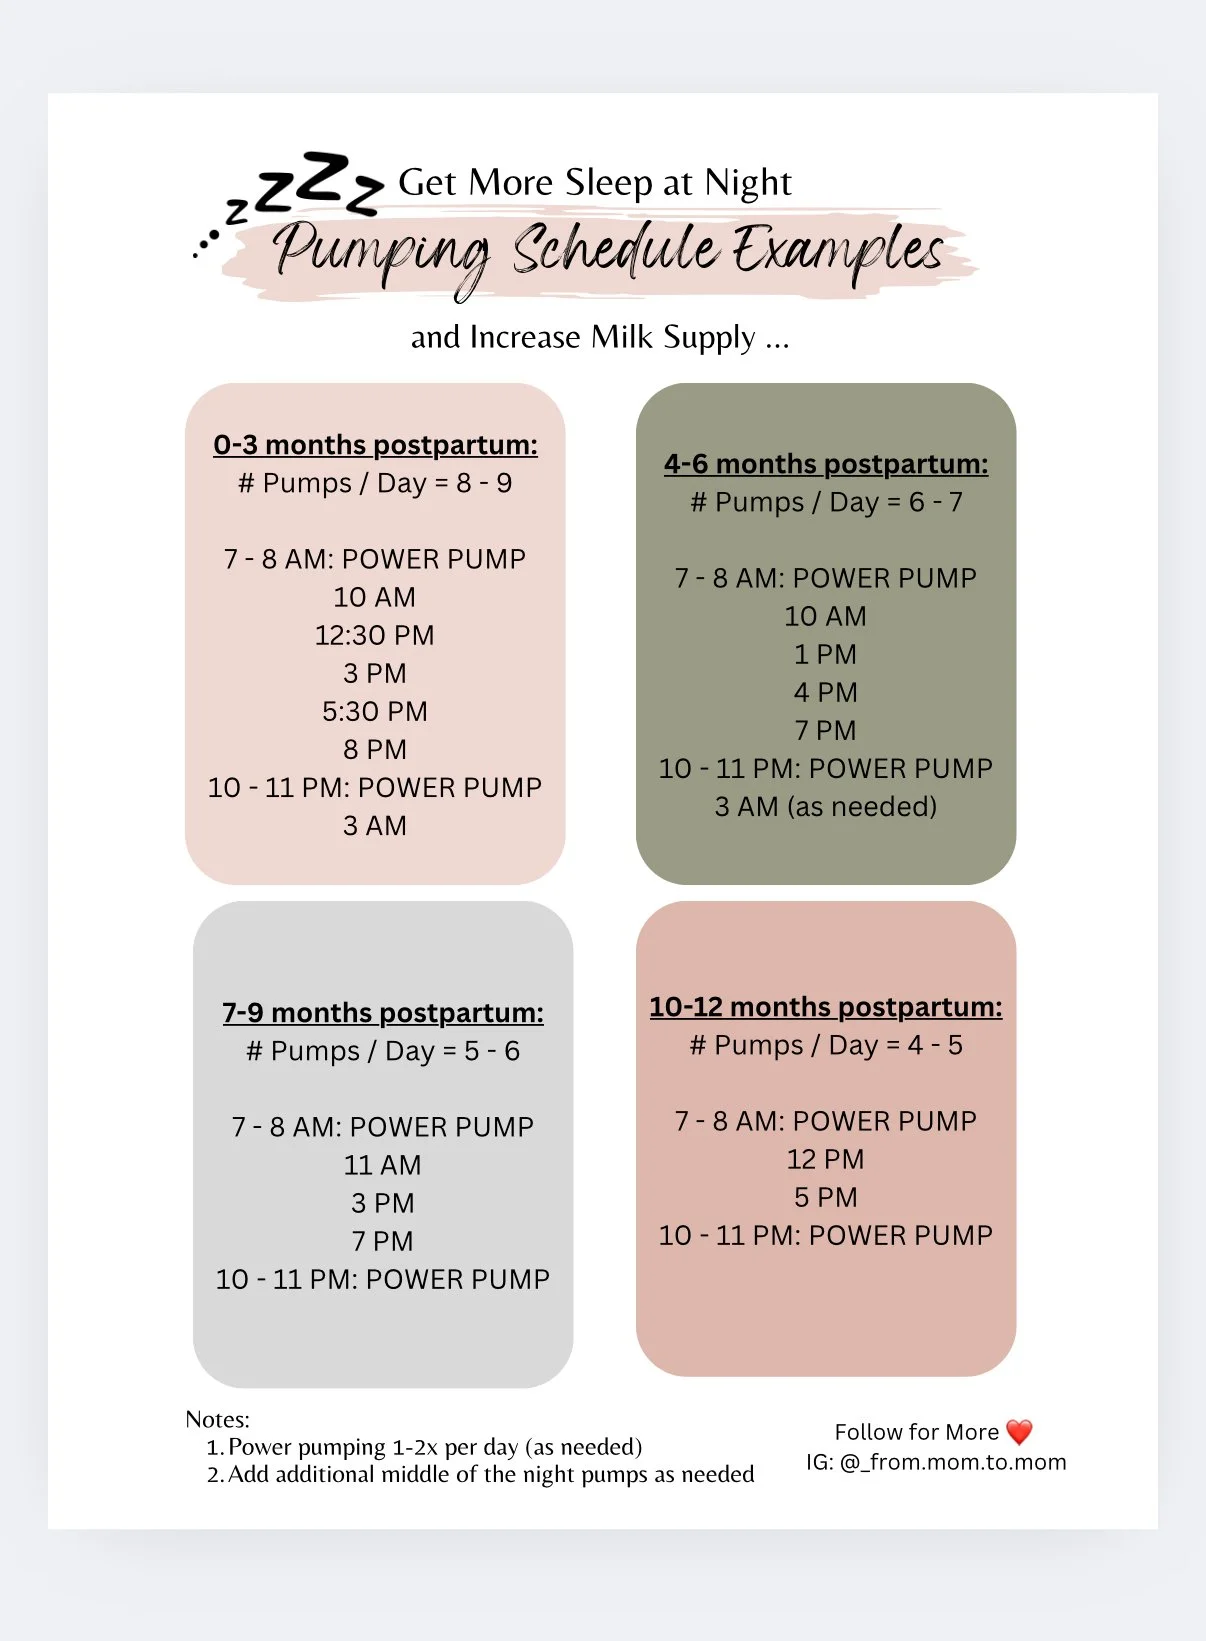
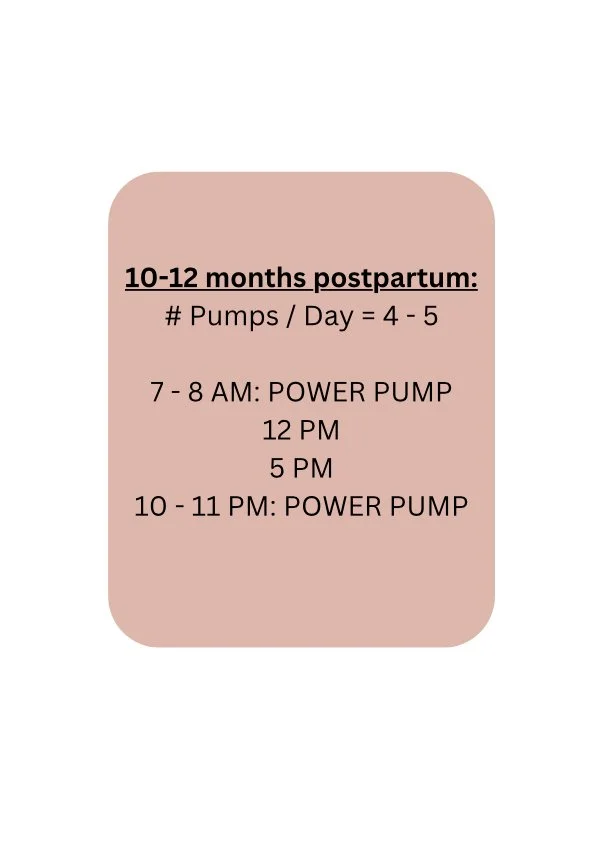
Get More Sleep AND Increase Milk Supply?? 👀
Yes, it IS possible!!
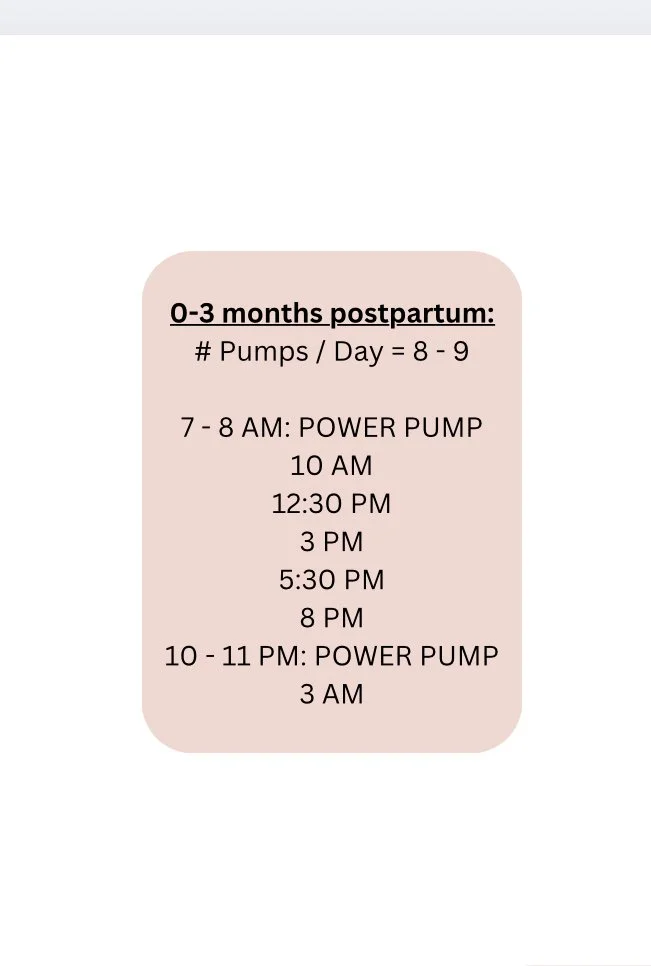
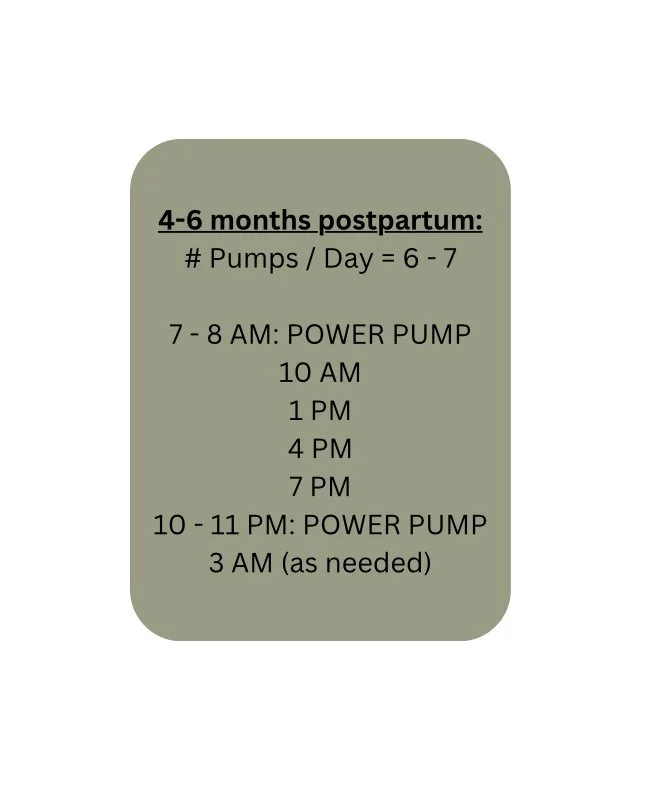
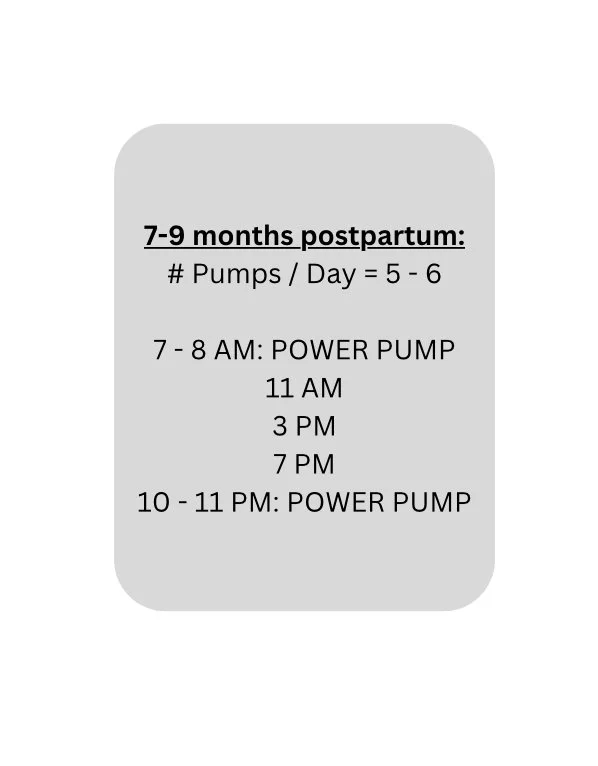
WHY: because for milk supply: milk removal, sleep, stress, and hormone balance are all important! With the schedules shown here, you can still pump an adequate number of times per day while front loading most of your pump sessions for during daylight hours and minimizing MOTN (middle of the night) pump sessions 👏👏
For example, with a newborn, you are pumping about eight times a day to mimic their feeding schedule, but two power pump sessions will help replace middle of the night pumping well also providing enough stimulation to you increase milk supply.
The key is spacing your pumps in a way that allows your body to still respond well to stimulation and emptying. That usually means keeping your total number of sessions still about 8 in 24 hours (and less after 3 months postpartum), with slightly longer gaps at night (like 5–6 hours instead of 3–4). I found that that shifting one session from overnight to earlier in the morning, or doing a "power pump" during the day, helps compensate. You’re essentially giving your body a break at night and making up for it with effective daytime sessions.
Sleep More Schedules also reduce stress.. another major factor in milk production. Less exhaustion means more consistent output, better letdowns, and a stronger mindset. Every body is different, so it may take a week or two of trial and error to find your perfect schedule and routine. But don’t be afraid to protect your sleep. Prioritizing rest isn’t just good for your mental health, it may actually improve your pumping journey.
When I first started pumping for my first baby at 5 weeks postpartum, I was pumping every 2-3 hours overnight because I had to feed in those time intervals as well, but after 8 weeks, even though my milk supply was still low, I was able to decrease night feeds, increase day pumping and still majorly increase milk supply!
Here are the schedules that worked for me…
IF you want the FULL PDF right to you, Follow me on my Instagram and comment “schedule” on this post here:
My Story: “Breastfeeding will be easy RIGHT?”
During pregnancy, I knew I wanted to breastfeed and planned on exclusive nursing my baby. While I did have some concerns and fears around breastfeeding, I thought it should come naturally.
When I left the hospital with my baby, I brought home a beautiful 8 lb healthy baby and starting nursing him at home. However, latch was painful those first few days. I was told at the by my doctors and nurses that this was normal and would sort itself out shortly. I continued to nurse through the pain, but knew something was off. I started to see lactation consultants and doctors regularly to help with our latch issue. It was determined his latch looked “OK” and he had no lip or tongue ties. However, at 5 weeks old he was barley back up to birth weight, and his pediatrician said we needed to start formula supplementing right away.
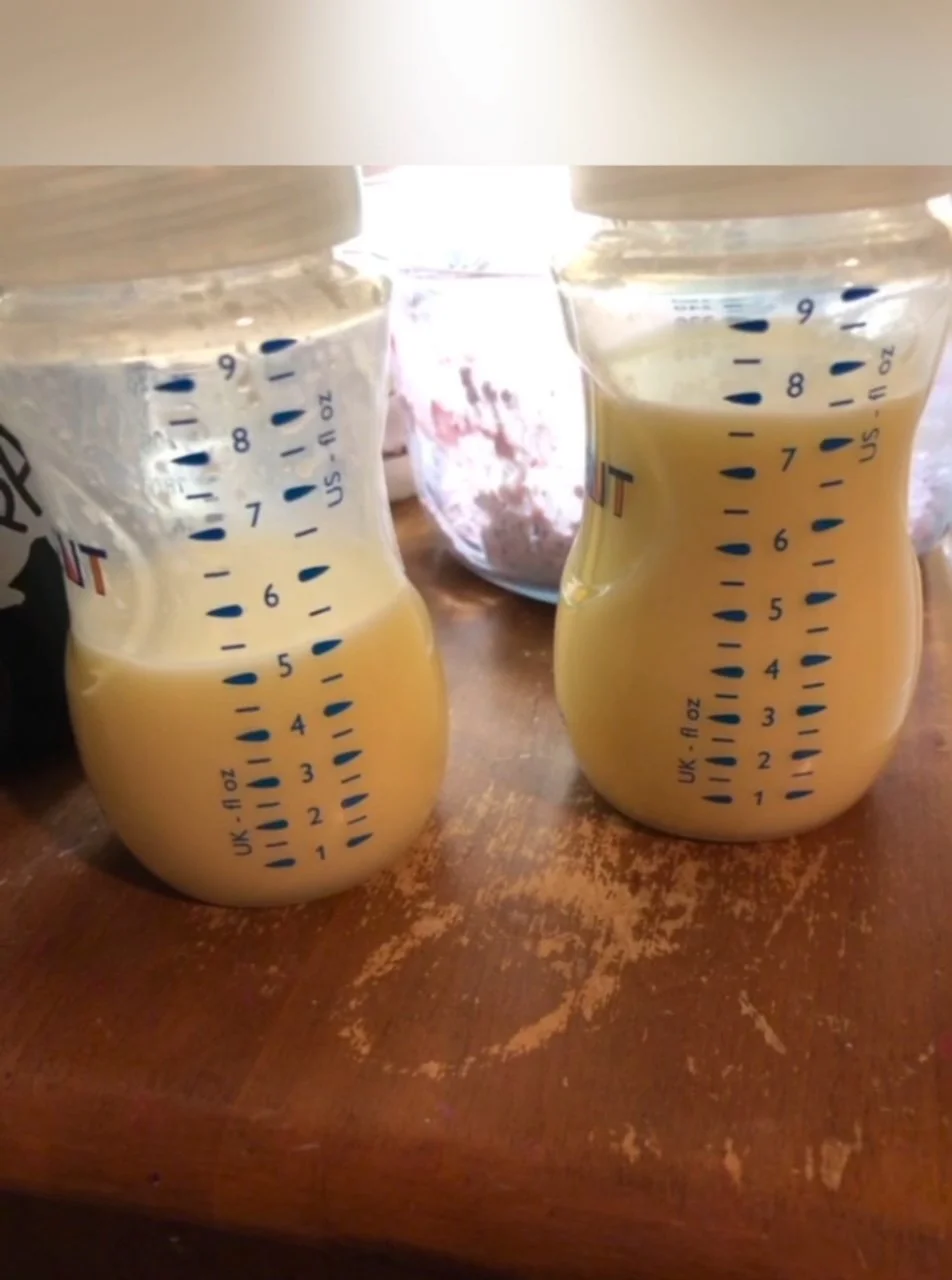
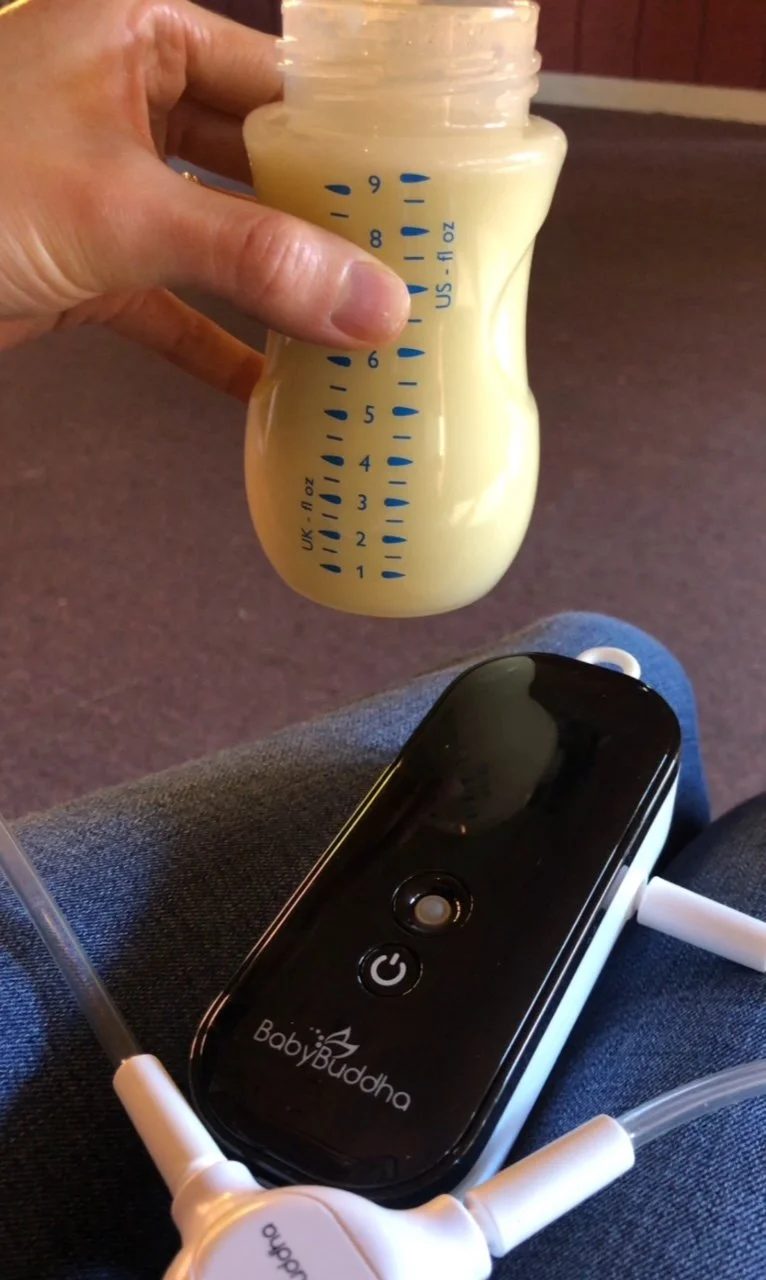
From under 10 oz to > 50 oz a Day: My Pumping Journey
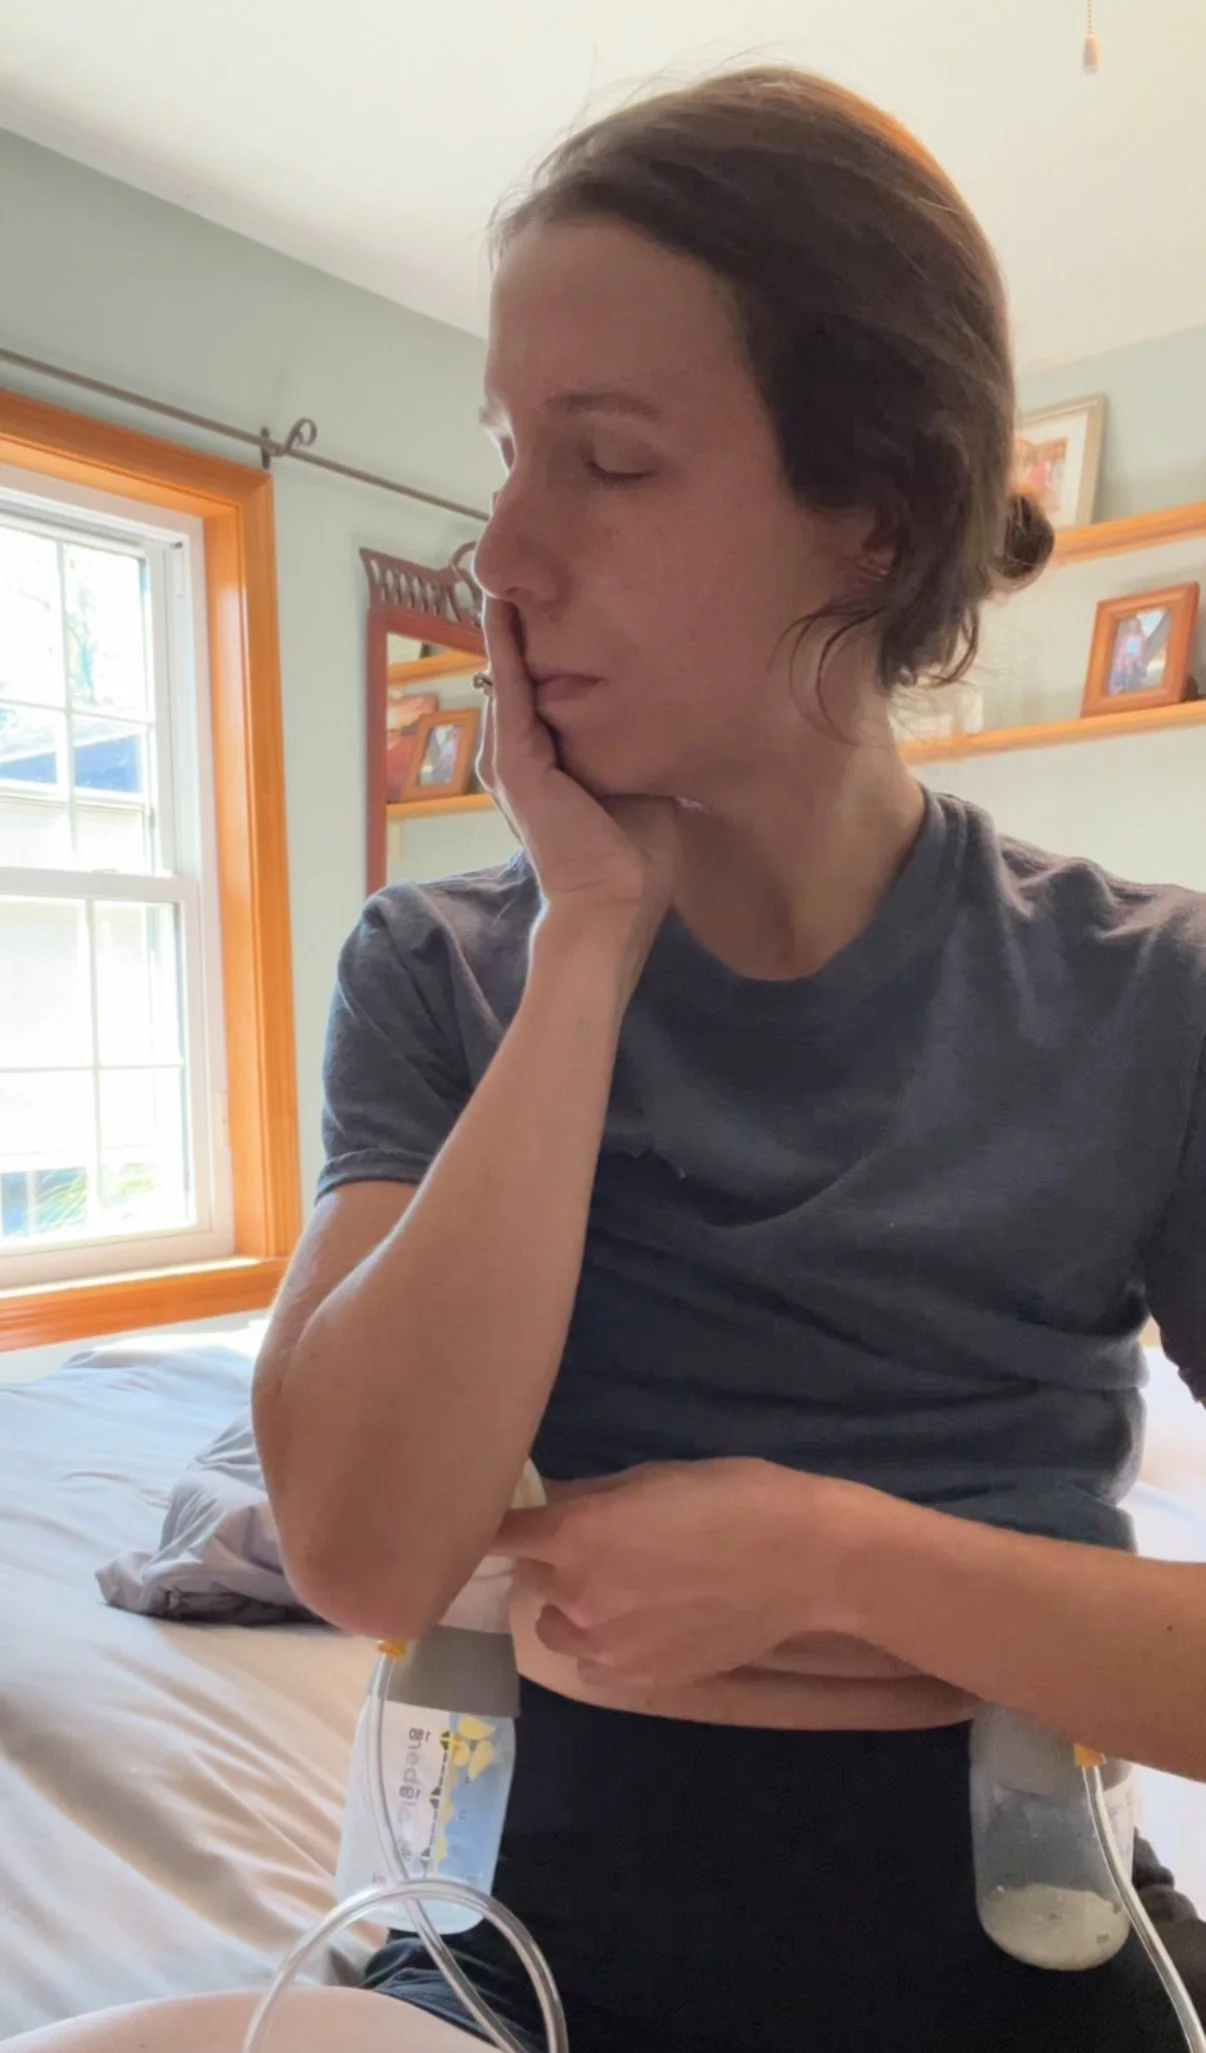
It was at this time that I decided to try pumping. At 5 weeks postpartum, when I first started pumping, I nearly lost my supply completely, producing just a few drops at each session. But I refused to give up.
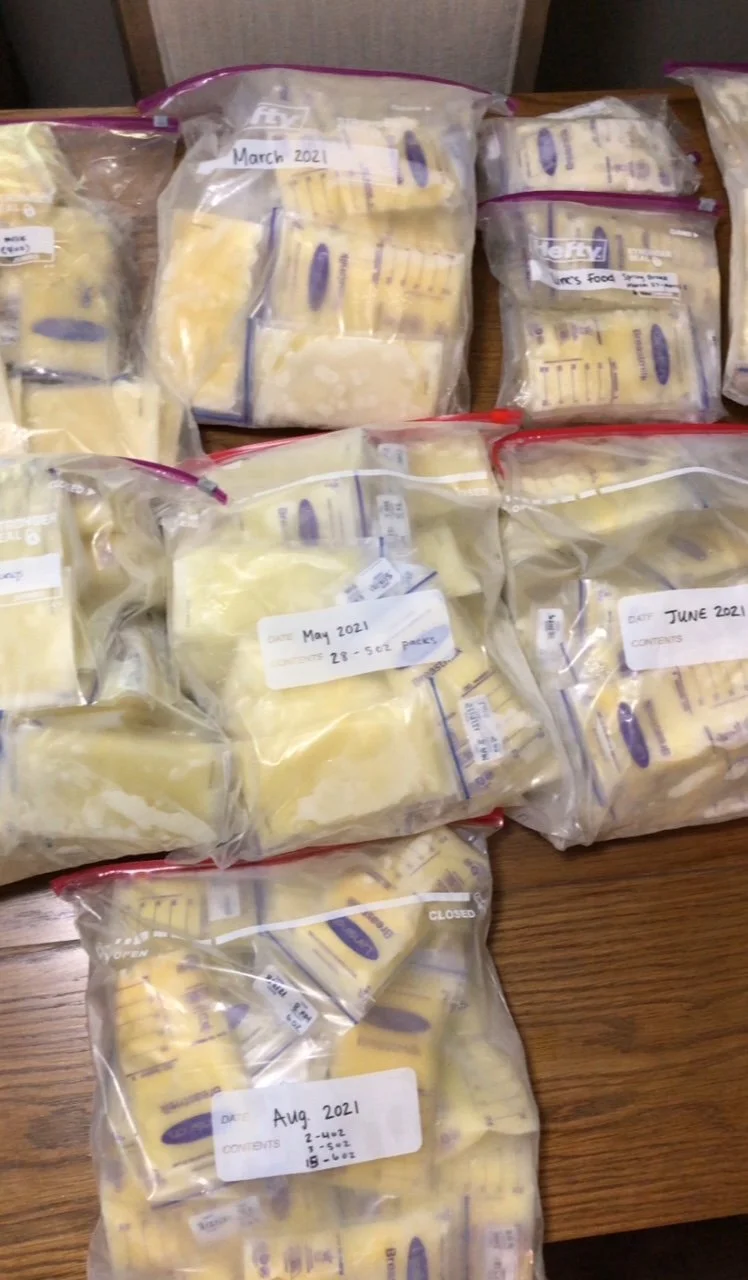
Through trial and error, I discovered pumping hacks, upgraded my pump, and found the tips that worked best for me. Slowly, my supply increased: first to 5 oz, then 20 oz, and finally over 50 oz a day with ups and downs over the time period of 2 months. I ended up exclusive pumping with enough to bottle feed my baby and thousands of oz to donate to my local mother’s milk bank.
Now, I’m passionate about helping moms like you navigate the challenges of pumping with confidence. Whether you’re exclusively pumping or nursing and pumping, this guide is here to empower you every step of the way.
Personally → I changed my flange size, got a new pump that worked better for me (BabyBuddha), added massage while pumping, kept to a strict 2-3 hour pump schedule, power pumped, ate better (and more), and took my prenatal vitamins. I added comfort while pumping: coconut oil in the flange tunnels (or get a pumping spray) and used pump cushions are some of the changes that I made.